


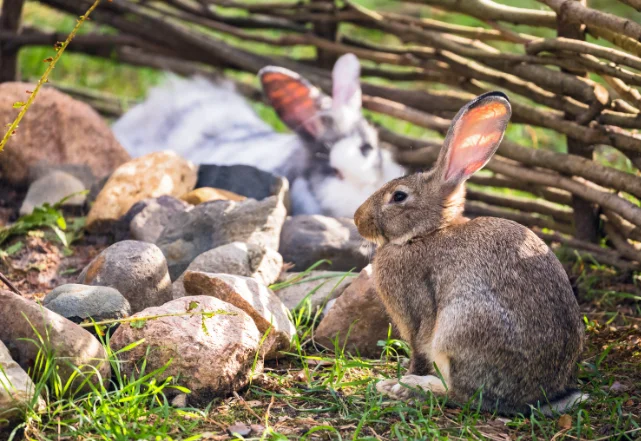

Rabbits are perfect to raise in your backyard as a steady source of delicious, lean and healthy protein, even in small backyards.
Rabbits are quiet, easy to breed, and are ready to harvest in 11-12 weeks. A breeding trio can provide you with up to 180lbs or more of meat each year.
And let’s not forget the wonderful fertilizer they provide for you to use in your garden or compost pile.
Rabbits don’t require a lot of space. In fact, the number of breeding animals can be adjusted to meet your need for meat, and available yard space.
I’ve compiled a handy list of the best rabbit breeds to raise for meat below.
Check Your Local Laws and Ordinances
Before you dive head first into meat rabbits, check all of your local ordinances and regulations regarding raising livestock (yes, meat rabbits can be considered livestock).
Many locales differentiate owning a pet rabbit from raising them as a food source. If you live in an area with an HOA, make sure you’re allowed to raise livestock.
The last thing you want is to get everything set up and find out that it’s not permitted.
Size Up Your Available Space
Now that you know for sure you can raise meat rabbits, you need to take determine how much space you have available for rabbit hutches.
Sketching out the space you want to use with accurate length and width measurements really helps. It seems tedious but it will save you a headache later on. After all, until you know how many hutches you can fit into your space, you can’t determine the number of rabbits you’ll be able to raise.
It’s best to have all of your caging, supplies, as well at the area you will be keeping your rabbits set up and ready before you bring your rabbits home. This will lessen the stress for both the rabbits and you.
Housing Your Rabbits
You have a couple of rabbit housing choices. Rabbits may be raised in hutches or in a colony.
The hutch system will let you keep track of when litters are expected. Hutches also make it easier to adjust your breeding frequency needs (if you need more meat, breed more does, for example).
You can build your rabbit hutches or colony caging (tons of plans and videos are available online), or you can purchase them from a farm supply store. If you build your own, you’ll have complete control of the dimensions.
Please keep in mind that each rabbit will need a hutch that is at least 36 inches long x 30 inches wide x 24 inches high.
Personally, I think it’s always better to give your rabbits more space if possible. The colony caging dimensions will depend on the method of colony raising you choose to use.
Examine the different methods and find the one that fits best for your available space and the amount of breeders you will be keeping.
The number of necessary hutches will depend on the quantity of breeding rabbits. Most first timers start with a breeding trio, or two does (female) and one buck (male).
Each rabbit will need its own hutch, plus you’ll need to have at least two grow out hutches for the weaned rabbits to stay in until harvest time.
It never hurts to build a few extra hutches to keep on hand in a pinch. And it makes expanding your production easier. After all, as with most livestock, you never know when you might have a larger litter born. While an unexpectedly large litter is wonderful, you’ll need more grow-out pens.
You can choose to house your hutches and/or colony cages outdoors or indoors in a garage or shed. If you keep your rabbits indoors, be sure the area is well ventilated. Fresh air is important to the overall health of your rabbits.
Predators Want Your Rabbits
Whether you choose indoors or outdoors, you must protect your rabbits from predators. Remember, we’re not the only species that enjoys the taste and health benefits of rabbit meat.
A determined predator can and will find a way to get its meal, so take all precautions possible.
- Make sure all latches on your caging are predator proof.
- Secure all doors on cages.
- Place hardware cloth over any small openings in walls.
- Ensure the doors and windows on any structures are secure.
- Use strong materials when constructing the caging and hutches.
- Choose hardware cloth over chicken wire for cage walls as it’s substantially stronger.
Providing For Their Needs
For your outdoor hutches and colony caging, be sure that they are in a shaded area, or even better have a self standing roof (something similar to a carport) that covers all the caging.
Also, placing a wall that extends on the side behind the caging, the roof and one wall will help protect your rabbits from the sun and bad weather, but allow good airflow. Some people even choose to construct a three walled structure for increased weather protection.
If the caging is on bare ground, I strongly suggest placing a layer of gravel (for drainage) under the cages with concrete pavers on top to provide an easier to clean area. It’s an extra step, but you’ll be glad you did it! It makes sweeping up the droppings (they make great fertilizer) and rinsing away urine very easy.
Most of the time you’ll use a hose to rinse away the urine. Occasionally (once or twice a week at least), you’ll want to disinfect using a mixture of white vinegar and water. One part white vinegar to 10 parts warm water sprayed onto the pavers and rinsed away cleanly disinfects and removes odors.
Keeping your rabbit’s housing and area clean is very important. Good hygiene lowers the risk of disease and illness, keeps odors under control, and helps reduce the amount of flies attracted to the area. Basically, it’s better for all involved!
Cleaning should be done at least once a day. A thorough brush cleaning and disinfecting should be done at least once a week.
Use a hard bristled brush to brush any stuck-on droppings off of the wire flooring before wiping it down with the white vinegar solution.
You can use straw, pine shaving s (never cedar) or a recycled newspaper bedding (like Carefresh) as bedding for the shelter.
The bedding should be checked daily and spot cleaned (remove any soiled bedding).
All bedding should be completely changed once a week. Wipe everything down with the white vinegar solution when you do a complete bedding change.
Litter Boxes Have Worked
Some rabbit breeders have had success placing a litter box in the open area of the hutch for the rabbits to use as a toilet. They place pine shavings or recycled newspaper bedding (like Carefresh or Yesterday’s News) into a large litter box along with some fresh rabbits droppings.
A paper towel dampened with their urine also helps attract the rabbits to the box. Many hang a hay hopper (holds the hay ration) right by the litter box (rabbits like to eat while they go).
The bedding must be changed every other day or more often if necessary. This helps reduce the amount of cleaning time by keeping the urine contained. You will still have some droppings to sweep up, but there will be less of it, and it’s a lot easier to clean up than the urine.
It’s recommended to have a resting spot in the open area of the hutch to give your rabbit a place to rest off of the wire. This is important for health of their feet. You can use a piece of untreated wood (check for potential splinters) or a patio paver that is large enough for your rabbit to stretch out on.
Wire flooring can cause foot problems in your rabbits, so this little step is beneficial for the rabbit and you (saves having to treat foot injuries).
Frozen 2-Liter Prevents Heatstroke
Rabbits don’t handle the heat well, so when the temperature is above 80-85 degrees F, place a frozen two liter bottle in each rabbits’ hutch. I guarantee that your rabbits will lay against the bottle to keep cool.
Replace the bottles when they fully thaw, and repeat the process on any day that the temperature goes above 80-85 degrees F.
Keep Those Flies Under Control
You need to control flies around your rabbit housing to prevent fly strike. Keeping the area free of urine and droppings as much as possible, as well as using fly traps and fly paper are a few steps you can take.
Feeding Your Rabbits
You should feed your meat rabbits a fortified, nutritionally complete rabbit pellet, containing 16% protein. Alfalfa based pellets are best for pregnant/nursing females and kits (baby rabbits) because they need the extra protein and calcium.
It’s best to feed your buck (male rabbits), and any females that are not pregnant or nursing, a timothy hay based pellet. Adult non-breeding rabbits don’t need the extra amount of calcium and protein that the alfalfa based pellets contain and need the higher fiber content in the timothy based pellets.
Rabbits should also be fed hay every day, and you should feed them hay the same way you feed the pellets regarding an alfalfa hay or a timothy hay.
Pregnant/nursing does and kits should have food and hay available at all times, where the buck and non-breeding rabbits should be fed a daily ration of pellets.
No More Than 1 Cup A Day
The recommended daily amount is 1/2 to 1 cup, divided between 2 meals. Rabbits can become overweight easily, and obesity can cause infertility.
Start with 3/4 cup and reduce or increase the amount as needed. Hay should be available at all times.
You can offer your rabbits dark leafy greens (be careful feeding these to kits as they can cause diarrhea), herbs, and small amounts of vegetables and fruits. Stick to very small quantities, particularly for fruit, due to the high sugar content.
Be sure to remove any uneaten fresh foods after a couple of hours to eliminate the risk of spoilage and reduce the attraction of pests.
The type of feeder that you choose is up to you. Many pick a food hopper that mounts on the outside of the cage, which makes feeding time easier and reduces food waste.
If you select to go with a food bowl, select a heavy ceramic crock, as rabbits are notorious for flipping over anything they can.
You will want to remove and replace any pellets or hay that becomes wet, these will mold and cause your rabbits to become sick.
Food hoppers or bowls should be cleaned at least once a week, more often if necessary.
Rabbits need fresh water available at all times. It’s best to use rabbit water bottles which can be mounted on the outside of the cage (makes changing and filling easier).
I suggest hanging 2 water bottles on each cage (more if needed) to ensure they always have fresh water available. Rabbits drink a lot of water.
Where To Get Your First Breeders
You will want to get the best quality breeding stock that you can. Meaning, it’s best to purchase your rabbits from a reputable breeder.
Never buy your breeders from pet stores, as these rabbits are not bred in the best conditions and are often not up to breed standards (many are mixed breed). A good place to find quality meat rabbits is to check out local 4-H clubs in your area.
These kids are raising rabbits to show at fairs, they’ll know a reputable breeder or two in your area. In fact, you might want to check out the livestock shows in your region and talk to some of the people that have are showing meat rabbits. Getting stock from these pros is a great idea as you know they’re purebred and of the highest standards.
If you can’t locate a 4-H club, check online for any local breeders of the breed you are interested in raising. Be sure you see how the rabbits are kept and walk away from anyone that doesn’t keep their rabbits in a clean and humane environment.
Most first timers will start with a breeding trio, consisting of 2 does and 1 buck, and will add more as they go along. When you purchase your breeding stock, it’s important that they are not all from the same litter.
You’ll want to get your does from a different litter than you get the buck. No need to start out with inbred rabbits!
If the breeder you go to only has one litter, you will have to find another breeder for the buck. You will want to do this anytime you replace your breeding stock as well.
Most breeders will keep the best females from their own litters to raise as replacement breeders, and then will purchase a new buck elsewhere. This needs to be done to keep your breeding stock’s genes strong.
When you are choosing your rabbits, be sure to select rabbits that have full hindquarters and long, wide loins (get familiar with rabbit anatomy before you go). These traits are a good indication that they will produce young that will provide good meaty carcasses.
You’re going to want to select your new rabbits when they are around 8 weeks of age. It’s always best to ask to see both parents (at least the mother), this will give you an idea on how your rabbits will turn out as adults. If the parents have a good body structure, their offspring should also.
Also, be sure that the rabbits you get are in good health, they should have clear, bright eyes, clean and dry nose, clean ears, strong teeth with good alignment, eating well, clean rear end, active, eating well and healthy skin and coat.
When you get your new rabbits home, and they have had a few days to settle in, it’s important that you start handling them. You need to get them used to being picked up, carried and touched. This familiarity will make it easier to do any health checks, treatments, grooming, breeding, cage cleaning and transporting.
Breeding Your Rabbits
Meat rabbit females (does) should not be bred until they are 8 months of age. This ensures they weight enough to support that first litter.
Now, they should be bred for the first time before they are 1 year old.
If a doe is bred after 1 year of age, she could develop issues with delivery which may cause her to require a C-Section or even result in her death as well as the death of the litter.
It’s best to retire does from breeding at about 3 years of age. You can harvest the retired does and replace them with younger does you retained from other litters. Plan on having a couple of replacement females started at least 8 months before the does reach retirement age.
The buck shouldn’t be used for breeding until he is 6 months of age and should be retired from breeding at about 5 years old. It’s best to retire the bucks at the same time that the does are retired. Be sure to purchase a new buck at least 6 months beforehand.
Female rabbits are induced ovulators, which means that they ovulate after breeding has occurred.
They do have a hormonal cycle that lasts about 18 days. She’ll be interested in breeding for 12–14 days and will have about 4 days when she won’t be.
Always take the doe to the buck’s cage for breeding. Female rabbits are very territorial and will most likely attack a male if he enters her cage. You’ll want to stay during the breeding to be sure that breeding does take place (it will happen very fast). While it may seem voyeuristic, it’s important, so you’ll know when to expect the littler.
Place the doe into the buck’s cage, and he should begin sniffing her right away and if she is receptive, she will lay flat and raise her rear end up. The male will breed her, and he will fall over on his side (he is fine, don’t worry).
It’s best to let the male breed her twice (after a short recovery from the first one, he will do it again) before removing her from the cage, this will help increase the size of the litter.
If a doe doesn’t allow the buck to breed her, she may be in the point of her cycle where she isn’t receptive. Take her back to her cage and try again the next day (you might need to do this for a couple of days). Now, if she still won’t allow him to breed, there could be another reason that needs to be looked into.
Take the doe back to her cage and mark your calendar. The gestation for rabbits is 28–35 days, with 31 being the most common. You can learn to palpate your doe to determine if she is pregnant (usually after day 12). There are videos online on how to safely palpate your doe.
A doe will often start nesting when she is about 3 weeks along. When she is only 2 weeks along, you’ll want to provide her with a nest box (look online for plans). You can use straw, pine shavings or recycled newspaper as bedding. She’s also going to start plucking hair from her dewlap (the roll of skin below her chin) to insulate the nest box.
Be sure to check the nest box daily and remove any soiled bedding. It’s important to keep the nest box clean for the health of the doe and kits.
A doe will typically give birth late in the evening, so be sure to check the nest box for kits when she is 28 days along.
Write down the date of birth for the litter, keeping this date helps you to know when your kits can be weaned, harvested or bred.
For the most part, the doe will do just fine on her own raising her kits (most litters will have 6-9 kits). Check their progress daily to make sure the kits are developing properly, are warm, and well-fed by the doe.
If you notice any issues, you may need to remove any kits that are showing signs of health issues, dead kits or kits neglected by the doe.
You may opt to bottle raise any kits that are neglected by the doe. Please be aware that some kits are rejected by the mother due to poor health. And you may not be able to save it.
The kits are born hairless with their eyes shut. Their eyes will open when they are about 10 days old, and when they are about 2 weeks old, they will start venturing out of the nest box. When they start wondering on their own, put a layer of newspaper or cardboard outside the box to keep the kit’s feet from getting caught in the wire floor.
You can breed the doe again when her kits are 4 weeks old. While she can breed right after giving birth, it’s best to wait. If she is bred too early, her body will be stressed trying to support the litter she has and the one that is growing inside her.
If you have a doe that doesn’t breed easily, neglects or kills the kits or produces small litters, you should consider harvesting her and using a replacement doe.
Keep records for each doe to track their success as breeders. Keep a log of the following:
-
- Her willingness to breed
- The sizes of each litter
- The number of kits she raises to weaning age
- Mortality rate of litters
- The weight of each of her kits at harvest as well as their carcass weight
This information will help you determine which doe or does female kits you should keep for future breeding. It’s also a good idea to keep a record of the bucks’ success at breeding. This could prove helpful if you notice a decrease in the number of kits your does are producing.
Be sure the doe always has pellets, hay and plenty of water available at all times, so she is able to provide the kits with plenty of milk. Some breeders will give nursing does a teaspoon of black oil sunflower seeds to increase milk production and provide her with some extra fat.
The kits eat a lot and require a lot of water as they grow. The kits can be weaned when they are 6 -8 weeks old and moved to the grow-out pens. It’s best to remove the kits gradually. Start by removing two of the largest kits the first day (you shouldn’t leave one kit alone in a cage, whether it is a grow-out cage or the does cage). Depending on the litter size, take 1-2 kits (biggest to smallest) out daily until they are all moved. This will help prevent the doe from getting mastitis.
Don’t overcrowd the grow-out cages, depending on the cage size. For example, a 24″L x24″W x24″H will hold 4-5 kits. Always make sure the kits have pellets, hay and water.
They are usually harvested when they are 10-11 weeks old, and should weigh 4-5 pounds (carcass weight is usually 1/2 of the live weight) by that time.
When the female kits are 8 weeks old, you can take a look to determine if they are good candidates for future breeding does (this is where your rabbit anatomy and meat breed body type knowledge comes in handy).
Harvesting Your Rabbits
The most important thing when it comes to harvesting any animal is that it’s done quickly and humanely. These animals are giving their lives to feed you and your family and deserve to have a quick and humane end.
Be sure to check your local regulations regarding home processing. Many places don’t permit it and if you plan to sell your meat to the public you may be required to have your rabbits processed at a USDA inspected processor.
If you have never hunted or harvested an animal before, you should watch the process from beginning to end (there are videos available online). This will help you determine whether performing this task is something you can do.
Thinking you can and actually doing it are very different. You can’t hesitate while dispatching an animal. This will only cause suffering, which isn’t something that should ever happen.
You can always check around to see if there are any rabbit farmers or processors in your area that would let you observe the process.
There are a few ways to dispatch rabbits for harvest, watch all the methods and find the one that you are going to be the most comfortable performing.
There are devices (one is called The Hopper Popper) available that are specifically made to dispatch rabbits quickly.
For those that are not comfortable with the harvesting process, you can contact a local processor (some now even offer a mobile service that will come to you) to have them process and package your rabbits.
Always be sure that you harvest your rabbits in a garage, basement or shed. Never do this in view of the neighbors or anyone passing by.
Keeping Your Rabbits Healthy
It’s very important to keep your rabbits healthy. After all, you want them to raise healthy kits to provide you and your family with meat.
Doing daily checks on your rabbits while cleaning, feeding and watering is essential. This gives you an opportunity to identify any issues and treat them before they have a chance to progress too far.
Do a weekly health exam where you remove the rabbit from the cage, place them on a table with a no-slip mat. Check their eyes, ears, teeth, skin, legs, and rear end for any signs of discharge, swelling, irritation, wounds or parasites, and don’t forget to check the toenails to see if they need to be trimmed.
There are videos available online on how to trim your rabbit’s nails.
Become familiar with all the health issues and diseases, so you will have an idea on what is wrong and the best way to treat it. You should also weigh your rabbits regularly.
Knowing the weights of your rabbits will be helpful in keeping your rabbits from becoming over or under weight, which could affect their fertility and their ability to raise healthy kits. Weight loss is also a sign of underlying health issues.
Weighing the kits when they are weaned, before and after harvesting, so it can be added to the mother’s records, is a good way to track each females’ success with producing kits with a good quality carcass weight.
You should have an isolation cage that is in an indoor area that is far away from the other rabbits. You can build a cage, or you can use a metal dog cage. Just be sure that the cage is large enough for the rabbit to move around comfortably and can a hold a food dish and litter box.
Keeping any sick or injured rabbit isolated is the best for the rabbit you are treating, as well as the best way to protect the other rabbits.
Some health issues and injuries may need veterinary care, so check vet listings in your area and find a couple that have experience in treating rabbits and keep their numbers on hand in case of emergency.
You need to keep the treatment cage clean, change any soiled bedding at least once a day (more often if necessary). It’s important for the rabbits’ recovery, as a dirty environment will prolong or prevent the rabbit’s recovery.
Be sure that you don’t use any harsh chemical cleaners in or around the rabbit’s cage. These chemicals can be harmful to the rabbit, so instead use a bleach solution (1 cup unscented bleach to 1 gallon of water) to clean the cage.
You should keep a pair of coveralls or a couple sets of old clothes to wear anytime you are handling the rabbit being treated. Wash them frequently and wear disposable medical gloves.
Taking any precautions possible when dealing with illness in your rabbits is always a good practice to keep your other rabbits healthy.
After the rabbit has recovered, thoroughly clean the cage, food/water containers, litter box, and the area around the cage using the bleach solution provided above.
How far you are willing to go to treat your rabbits is entirely your decision, a lot of factors (finances, length and difficulty of treatment, age of animal) come into play when you are raising livestock. The decision not to treat an animal is difficult, just do what is best for the animal as well as for you and your family.
Best Meat Rabbit Breeds
Breed
Adult Weight
Californian
8-12 pounds
New Zealand
9-12 pounds
American Chinchilla
9-11 pounds
Satins
up to 12 pounds
Rex
8 to 10 pounds
Silver Fox
10 to 12 pounds
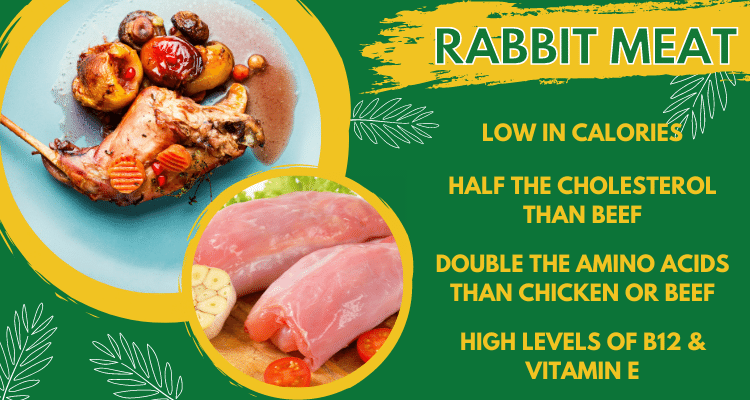
Rabbit Meat Nutritional Facts
Per 3-ounces (85 grams)
-
- Calories – 147
- Protein – 28 grams
- Total Fat – 3 grams
- Sat Fat – 0.9 grams
- Cholesterol – 105 milligrams
- Sodium – 38 milligrams
- Potassium – 292 milligrams
- Total Carbs – 0 grams
Signs of Illness in Rabbits
-
-
- Loss of appetite
- Lethargy
- Discharge from eyes, nose or mouth
- Change in behavior
- Vocalizations (rabbits are usually quiet)
- Wheezing, coughing, sneezing
- Diarrhea
- Swelling
- Limping
- Loss of balance or head tilt
- Paralysis
- Teeth grinding
- Unusual posture
-
Common Health Issues and Diseases in Rabbits
-
-
- Obesity
- Overgrown or misaligned teeth
- Ear mites
- Hairballs
- Fly strike
- Uterine Tumors
- Abcessess
- Rabbitt Bumble Foot
- Snuffles
- Pasteuellosis
- Bordetella brochisiseptica
- Staphylococcis aureus
- Moraxella catarrhalis
- Mycoplasmas
- Myxomatosis
- Rabbit Calicivirus (rabbit haemorrhagic disease virus)
- Rabbit E. cuniculi
- Rabbit Ileus
- Coccidiosis
- Enteritis
- Epizootic Rabbit Enteropathy
-
First Aid Kit for Rabbits
-
-
- Gauze Pads (non-stick)
- Roll Gauze
- Disposable medical gloves
- Bandage Tape
- Vetwrap
- Cotton Pads (found in cosmetic department)
- Cotton Swabs
- Vetericyn (disinfectant)
- Eyedropper and 10 cc oral syringe
- Styptic powder
- Cat nail scissors or small dog nail trimmers
- Oxbow Critical Care (nutritional powder for force-feeding during illness)
- Infant gas drops (simethicone 1ml every 4 hours)
- Digital small pet scale(available online)
- Heating pad
- Ice packs
- Antibiotic ointment(no pain relief)
- Rectal Thermometer (most accurate for rabbits)
- Petroleum jelly
- Tweezers
- Bandage Scissors
- Blunt tip scissors
- Kitten Milk Replacer (for orphaned kits)
- Stethoscope
- Mineral oil
- Hydrogen peroxide
- Rubbing alcohol
- Saline solution (eye wash)
- Pedialyte
- Probios Probiotic supplement
- Small LED flashlight
- Hand sanitizer
- Old towels and washcloths
- Coveralls or sets of old clothes
- Cat or small dog carrier
-