


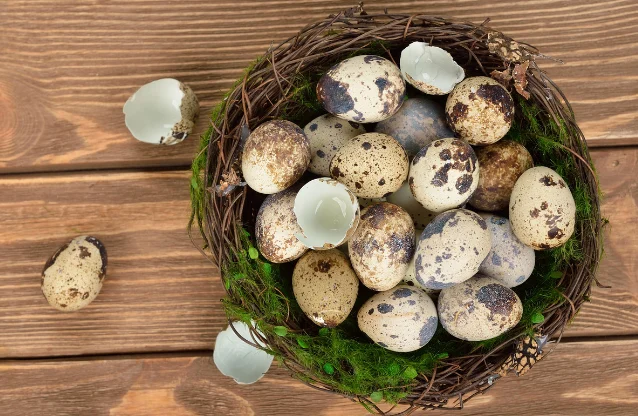

Quail are perfect for Hobby Farmers, they’re small, quiet and easy to raise, even in small yards. Quail mature very quickly and go from hatch to harvest in 6-8 weeks, and they can also start laying eggs (1-2 per day) when they are 6-8 weeks old, so this makes it easy to stock your freezer with a low fat, high protein meat as well as have a steady supply of eggs, a chart of the nutritional breakdown is provided below.
Quail meat and eggs are very popular (especially with restaurants), and depending on the amount of birds you decide to raise, you could even sell your quail meat and eggs to help offset the cost of raising them. So if you are interested in getting started raising your own quail, use this guide to help you get going.
The first thing you have to do before getting started, is to check all local and city ordinances regarding raising livestock in your area, also if you live in an HOA, be sure to check with them to see if you are permitted to raise quail, you don’t want to get everything set up and find out that you aren’t allowed to.
CHOOSING YOUR LOCATION
Now that you have the green light to start raising quail, you will need to find the area to raise them, but there are a few things that you need to decide beforehand, are you only raising enough birds for your needs or enough to sell, what type of housing you want to use (caging or aviaries), and the amount of space in your yard that you want to use.
It’s recommended to take measurements of the area, you will need these measurements when you are deciding the housing for your quail.
Once you have made the decisions that will work best for you, you can start setting up. It’s important that you have everything set up and ready, as well as all the supplies you will need, before you bring any quail home.
HOUSING
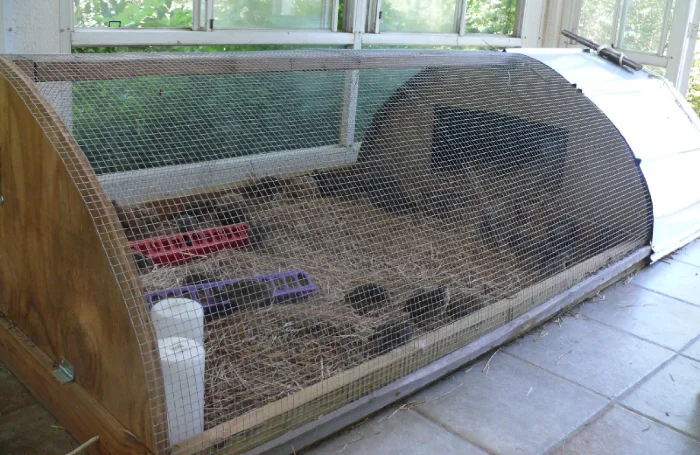
There are a couple of options for housing your quail, caging system or aviaries, look at both options and choose the one that works best for you, your available space and the amount of birds you want to raise.
You can build your own caging system or aviary (several designs and plans are available online) or you can purchase them from farm supply stores or online. It’s better to build or buy your preferred housing a little larger (still within your available space), it’s likely that you will want to add more quail along the way. Whether you are using a caging system or an aviary, you need to make sure that your quail are well protected, by predator proofing them in every way possible.
Predators, both wild and domestic, are clever and determined to get to your quail, placing hardware cloth (using screws and washers)over any windows and vents, burying hardware cloth at least 2 feet on the outside and inside the perimeter of outdoor enclosures, make sure any outdoor enclosure is completely covered by either hardware cloth or a roof and use latches that are predator proof (raccoons can easily figure out several standard latches). You can’t over do when it comes to predator proofing.
It’s important to keep in mind when choosing your enclosure, that each quail needs 1 square foot of space, but even though quail live well in large colonies, giving them a little more room is always good, overcrowding can cause stress and increase the risk of health problems.
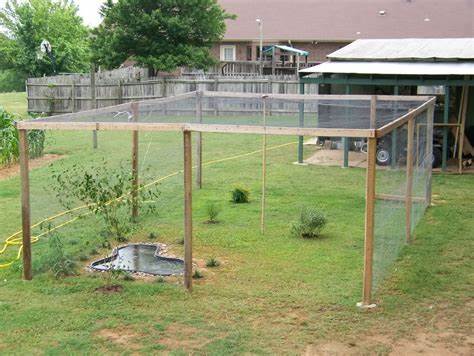
The caging system should be kept in a well ventilated, weather and predator proof structure, and when using an aviary, your quail should have access to a coop for shelter, this doesn’t need to be as big as a chicken coop, a structure similar (but smaller) to a duck house (quail don’t need roosting bars) would be better, it should also be weather and predator proof and well ventilated. Having a hinged roof on your quail coop will make cleaning and egg gathering easier.
Keeping your quails enclosures clean is very important to keep the risk of health issues down, as well as odors.
-
- Wire flooring in caging systems should be cleaned (using a stiff bristle brush) once a day to remove droppings, and the dropping tray should be cleaned after, wipe both the floor and the tray with a bleach solution at least once a week.
- In an aviary, you should spot clean the bedding (straw or large flake pine shavings) in the coop and enclosure daily and be changed weekly.
- Waterers should be cleaned (use dish soap or bleach solution and rinse well) and filled daily, quail need a consistent source of fresh clean water, so be sure this is done at least once a day.
- Feeders should be checked daily, remove any soiled feed and clean the feeder at least weekly.
Here is the recommended bleach solution ratio, 1 cup of unscented bleach to each gallon of water.
FEEDING YOUR QUAIL
Your quail should eat a high quality, nutritionally complete diet made for game birds or turkey. Quail require a higher protein content in their diet than chickens do, so it’s important to provide them with the proper diet. Here is the recommended food for each stage of development.
-
- Hatchling until 6 weeks: 24-25% Protein game bird/turkey starter crumble.
- 6 weeks and over: 22% Protein game bird/turkey grower/breeder diet
You will need to provide a dish of grit for digestion and a dish of crushed oyster shell for calcium (for layers and breeding females).
The feeders and waterers you chose should be designed for quail if possible, the feeder should allow the quail to only get his head inside because they will stand in an open dish and scratch the feed out as well as poop in it, be sure whatever waterer you choose is safe for your quail.
You can offer your quail vegetables, fruits (very little due to high sugar content), dark leafy greens, mealworms and crickets (no wild caught). Be sure that you don’t overdo with treats, they should only make up 10% of their diet, but they should be offered to provide some extra nutrients to your quails diet.
Vegetables, fruits and greens should be cut or shredded into smaller pieces to make it easier for your quail to eat, and it’s important to remove any uneaten fresh foods after 2 hours to keep it from spoiling and to not attract pests.
COTURNIX QUAIL AND WHERE TO FIND THEM
Coturnix quail are quiet, gentle and easy to raise birds that are perfect for Hobby Farmers, they go from hatchling to adult in 6–8 weeks, and female quail can start laying eggs at 6–8 weeks of age, this means you can have a steady supply of meat and eggs in a lot less time, feed and space than chickens require.
Quail live for 1.5-4 years, come in a variety of colors, and live together in colonies very well. Most people that raise quail will keep 1or 2 breeding colonies consisting of 4–5 females and 1 male, as well as having a couple of layer colonies (all females of course) and 1or more grow out pens (usually all males).
They also will usually retire the laying females and breeding colonies at 9 months – 1 year of age, these birds are harvested for the freezer. It’s best to start your new colonies before you retire the old ones to help keep or, depending on how early you get them set up, eliminate the amount of time your production will be down.
Depending on the color variety, telling the difference between the males and females is pretty easy, the natural color variety is the easiest to see, males are a rich gray and brown, and have a darker rusty coloration to their chests, and females will have light-colored feathering, and a buff colored chest with black speckles.
The differences can be seen when the chicks develop their chest feathers at 2–3 weeks of age.
To get your quail, you will need to purchase either hatching eggs or hatchlings from a reputable hatchery, there are some available online, such as McMurray Hatchery, Meyer Hatchery or Stromberg’s Hatchery.
It’s easier to buy hatchlings to start your breeding and laying colonies, but since most domestic quail won’t brood their eggs, you will need to have an incubator to continue restocking your colonies.
Quail eggs hatch between 16–20 days, with 18 being the normal amount, and then they will spend 4–6 weeks in the brooder.
There are several sizes and types of incubators (if not included, make sure you get egg trays that are for quail eggs) available, either in farm supply stores or online, just be careful to get your incubator from a reputable source, for your safety as well as the eggs you will be incubating, a poorly constructed incubator can pose a fire risk and if it doesn’t function properly, you could lose your hatching eggs. The size of the incubator will depend on how many quail you will need to have available.
Always be sure to follow all the directions for your incubator, quail eggs need a different temperature and humidity than chicken eggs in order to hatch, so be sure to follow the directions for quail eggs.
Every so often, it’s recommended to purchase some hatching eggs from a hatchery and mix the hatchlings into your breeding colonies to give your breeding stock some new genetics to your lines, this will keep your colonies stronger.
BROODING QUAIL CHICKS
You will want to have a brooder set up and running at least a few days before bringing any quail home, it’s important to know that the heat source is functioning properly and that you have a safe, warm place for your new quail.
Quail hatchlings are small and fragile for their first couple of weeks, so it’s vital that they are kept in a warm, draft free area, to help get them through this stage.
Large plastic storage containers (40-45 gallon) make good brooders for quail chicks, each quail chick needs 1/2 square inch of space and the amount of space will need to increase as the chicks grow, eventually each chick will need 6-7 square inches of space in the brooder, so plan ahead and go with a bigger brooder from the start.
When using a storage container, cut a window in the lid, leaving about 3–4 inches from the edges, using duct tape, attach hardware cloth across the window opening. This will provide ventilation, reduce escapes as the chicks get older, and keep pets and children out.
You will need a heat source for your brooder, brooding plates are a safer, more consistent way to provide heat for your chicks, yes heat lamps can be used, but always use them with caution.
Brooding plates are available at farm supply stores and online. When you are putting your hatchlings into the brooder, be sure to place each one under the brooding plate, so they will know where to find the heat. The brooder temperature needs to be 95 degrees F for the first week, and then you will need to drop the temperature by 5 degrees every 3 days or so until the chicks are ready to leave the brooder.
Quail chicks develop their feathers a lot quicker than chickens do, so they will need heat for a shorter time.

Pine shavings and recycled newspaper bedding such as Carefresh are good brooder bedding, and should be spot cleaned daily (remove any dropping clumps)and completely changed at least once a week (more often if necessary), keeping your brooder clean is important for the health of your quail chicks.
When cleaning your brooder, wipe the brooder, food and water containers at least once a week using a bleach solution (recommended ratio is listed above), be sure to allow it to dry completely before putting new bedding in.
Having a second container to use as a brooder would come in handy when the time comes to completely clean your brooder, you could set up the other container and move the heat source into it and add the chicks right away, this will be easier for you and the chicks.
Food and fresh water need to be available to the chicks at all times, the chicks should be fed a game bird or turkey starter crumble until they are 6 weeks old, it’s best to use a chick trough type feeder that have multiple openings for the chicks to eat from (they come in plastic and metal), open dishes will allow the chicks to stand in the food and scratch it out and poop in it, this is a waste of feed.
You will need to use a waterer made for quail or a chick waterer with a narrow moat, this will keep your chicks from drowning, if you go with a waterer that has a wider moat or is an open dish, place marbles along the bottom, to prevent drowning.
These feeders and waterers can be found at farm supply stores or online. Be sure to take each chick to both the food and water dish and gently place their beak into them, so they know where the food and water are.
The chicks will be ready to put into your chosen housing when they are 6 weeks old, be sure if you are using an outdoor aviary that the outside temperature is above 50 degrees F at night unless you provide a heat source in their coop, until the temperature is consistently 50 degrees or higher.
Always keep an eye on your young quail after putting them into their new homes to be sure they are settling in and eating and drinking well.
KEEPING YOUR QUAIL HEALTHY
When raising any livestock, it’s important to know how to care for them properly and how to take care of them when they are injured or sick, and even though quail are relatively healthy little birds, you could encounter one or more that become sick or injured, so becoming familiar with quail anatomy, the common diseases, health issues and injuries is very important.
A list of the common diseases and health issues you may encounter as well as a first aid kit for your quail are provided below.
Look at all of them, so that you will have an idea of what to look for and how to treat it, animals are very good at hiding illness and are usually already pretty sick when they show the signs, so knowing these signs will help you begin treating your bird or birds fast, time is of the essence to help ensure the birds’ survival as well as the lives of your other birds.
You should look closely at your birds every day for signs of any problems, look for any discharges from their eyes, nares (nostrils)or mouth, dirty vent areas (rear end), abnormal droppings, or any signs of injury.
A list of the signs of illness is provided below, it’s always best to make your daily health checks a habit, it’s a good habit to have.
Make sure that you look into veterinarians in your area that have experience treating birds or livestock, keep a few numbers on hand in case of emergency.
You will want to keep a quarantine cage on hand in case you need it, you don’t want to be running around trying to find something to use when you have to treat a bird.
The quarantine cage needs to be kept in an area far away from the rest of your birds, the area should also be warm, draft free, quiet and safe from pets, predators and children. You can use a storage container with a similar set-up to your chick brooder, you can use a heat lamp or brooding plate to provide heat for the patient.
It’s best to have a set-up that can house more than one quail, in case you have to treat multiple birds, that way the cage is not overcrowded, which will cause more stress to the birds, you can put up a partition in a larger container if you only have one bird to treat, be sure there is room for a food and water container, the bird should always have them available.
Pine shavings or newspaper (no shiny ads) make good bedding for the quarantine cage, the cage should be spot cleaned at least once a day, and changed completely as often as needed, keeping the quarantine cage and area clean is very important, when cleaning use a bleach solution (the recommended ratio is listed above), wipe down the cage (allow to completely dry before setting back up) and wash the food and water containers (rinse well).
You should have a pair or two of coveralls or a couple sets of old clothes to wear while you are treating any sick birds, these should be washed frequently and never worn around your other birds, wearing these will help prevent you from transmitting any illness to the healthy birds.
Always wash your hands and arms any time you handle a sick bird, you can’t take too many precautions when it comes to the health of your birds, it’s better to be safe than sorry.
After the bird is well, make sure that the cage, food and water containers and surrounding area are thoroughly cleaned using the bleach solution. Hopefully you will never need to use your quarantine cage, but you will be grateful it’s there if you need it.
HARVESTING YOUR QUAIL
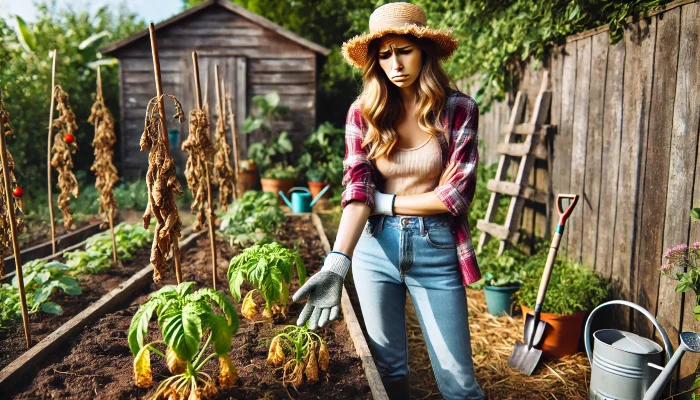
This can be the most difficult part of raising livestock for many people, but it’s a necessary part of it, the most important thing is that whether you choose to do it yourself or have someone do it for you, is that it’s done quickly and humanely, the animal deserves this, it’s giving its life to benefit you, and you owe it a humane death.
Be sure to check local regulations regarding home harvesting, some don’t permit it and if you plan to sell your meat to the public you may be required to have your quail processed at a USDA inspected processor.
If you have never hunted or raised meat animals, it’s highly recommended for you to either watch the procedure (there are videos on YouTube for home processors) or check with local processors in your area if you can observe the process of poultry processing, this way you will have an idea what you will encounter when it comes to harvesting your birds, if you feel that you can’t do it yourself, have your birds processed by a professional processor (there are now some processors that will come to your home), but if you feel that you are comfortable doing it yourself, watch the videos on how to do it properly several times before attempting it, thinking you can and actually doing it are totally different, the last thing you want to do is be hesitant or have to make more than one attempt.
If possible, have someone that has experience come help you for the first harvest or two, that way it will ensure that the whole experience goes as smooth as possible for you and most importantly the birds.
When doing home processing, always do it in a garage, or some temporary tent that will block the view of neighbors, you should never do this where it’s visible to the public, especially children (other than your own if you wish for them to observe), please always be discreet.
Nutritional Facts for Quail Meat and Eggs
Quail Eggs – per egg Quail Meat- per 100 grams
Calories- 14 Calories- 134
Fat- 1 gram Fat- 4.5 grams
Saturated Fat- 0.3 grams Carbohydrates- 0
Sodium- 13 milligrams Protein- 22 grams
Potassium- 12 milligrams Sodium- 51 milligrams
Carbohydrates- 0 Potassium- 237 milligrams
Protein- 1.2 grams Calcium- 13 milligrams
More To Discover
- Keep Chickens in Your Backyard and Feed Healthier Eggs to Your Family While Saving Money
- Iconic Doñana Wetlands at Risk: Strawberry Farming Threatens World Heritage Site
- Grain Husk Packaging: The Future Alternative to Plastic Styrofoam in Your Next Delivery
- 9 Trailblazers of Mycelium-Based Meats: 8 Young Fungi Brands You Can Eat Right Now And Their Godfather
Iron- 4.5 milligrams
Be On The Lookout For These Common Quail Symptoms of Illness
- Any swelling in face, body, feet or legs
- Changes in behavior
- Changes in eating and drinking habits
- Closed eyes
- Decline in egg production
- Dirty vent area (rear end)
- Discharge from the eyes, nares (nostrils) or mouth
- Dropped wings
- Feather Loss
- Huddled in corner
- Lethargy
- Paleness
- Skin irritations
- Sneezing, coughing or rattling
- Ruffled feathers
- Weight loss
List of Diseases and Health Issues in Quail
- Bumble Foot
- Coccidiosis
- Coryza
- Egg Binding
- Mites
- Mycoplasma Gallisepticum
- Quail Bronchitis
- Round Worm
- Scaly Leg Mites
- Tape Worm
- Ulcerative Enteritis (Quail disease)
Assemble A Quail First Aid Kit & Be Prepared
- Antibacterial Ointment (no pain relief)
- Bandage Scissors
- Blue-Kote (antibacterial/antifungal spray)
- Cat Nail Scissors
- Cotton Swabs
- Coveralls or Old Clothes
- Disposable Medical Gloves
- Electrolytes (Poly-Sol without iron)
- Eye Dropper or Needleless Syringe
- Hand Towels and Washcloths (old ones work fine)
- Hydrogen Peroxide
- Kitchen Scale
- Non-Stick Gauze Pads
- Paper Towels
- Rubbing Alcohol (great to clean tools after treatment)
- Small Scissors
- Styptic Powder
- Sulmet
- Tweezers
- Vaseline
- Vetwrap (2-inch rolls)