


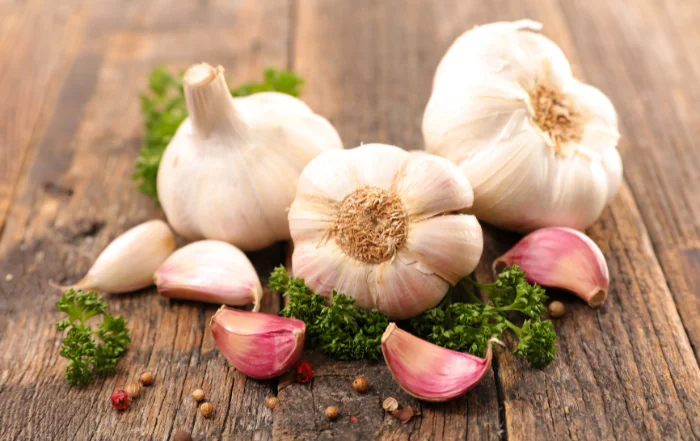

Garlic (allium sativum) is a member of the onion family and has been used for both its medicinal properties and as a flavorful addition to our recipes for thousands of years. It’s more than proven itself to be a powerful ally in keeping us healthy, and should be an ingredient that is in all of our kitchens.
Take a look at this information to help you make the decision to add this stinky little powerhouse to your kitchen and garden.
Historical Facts About Garlic
-
- Garlic originated in Central Asia and made its way to the Middle East and Northern Africa around 3000 BC, and then quickly went into Europe.
- In 1858 a well known microbiologist and chemist found and proved that garlic was capable of killing germs and reducing infections in wounds.
- Garlic was used as penicillin in Russia during World War 2.
- Garlic was brought to the US in the 1700s, but didn’t become popular until the 1920s.
- Garlic was one of the first herbs to be cultivated, about 4000 years ago.
- Ancient Egyptians were the first to add garlic to their cooking.
- There are archaeological records that note garlic was even used in Neolithic times over 7000 years ago.
- The name garlic comes from the Anglo-Saxon word garleuc, meaning spear leek.
- Ancient Olympians would eat garlic before competing to increase their strength.
- Pyramid workers were given garlic to increase their strength and stamina.
- Garlic was used by ancient cultures to treat parasites, circulatory issues, abnormal growths, treat wounds, digestive issues, respiratory issues and ulcers.
Health Benefits of Garlic
- May help strengthen your immune system
- May help reduce high blood pressure
- May help reduce cholesterol
- May help protect the liver
- May improve bone health
- May help reduce inflammation
- May help you live longer
- May help reduce blood clotting
- May improve eye health
- May reduce digestive and intestinal issues
- May improve skin and hair health
- May help protect against cell damage and aging
- May improve brain health
- May help shorten the duration of colds and flu
Interesting Facts About Garlic
-
- There are over 450 varieties of garlic.
- Garlic was one of the first cultivated herbs.
- Garlic is very nutritious, but contains only 4 calories per clove.
- Garlic and onions are toxic to cats and dogs.
- 400 million pounds of garlic is grown every year.
- 90% of the US grown garlic is grown in California.
- China is the largest producer of garlic.
- Garlic’s flavor is the most intense after it’s minced, as mincing ruptures the cells, which causes a chemical reaction.
- Many cultures believe garlic wards off evil spirits.
- Elephant garlic isn’t a true garlic, it’s actually a type of leek.
- Taking a drink of lemon juice after eating garlic will help get rid of garlic breath.
- Planting garlic among your vegetable plants will help keep pests away.
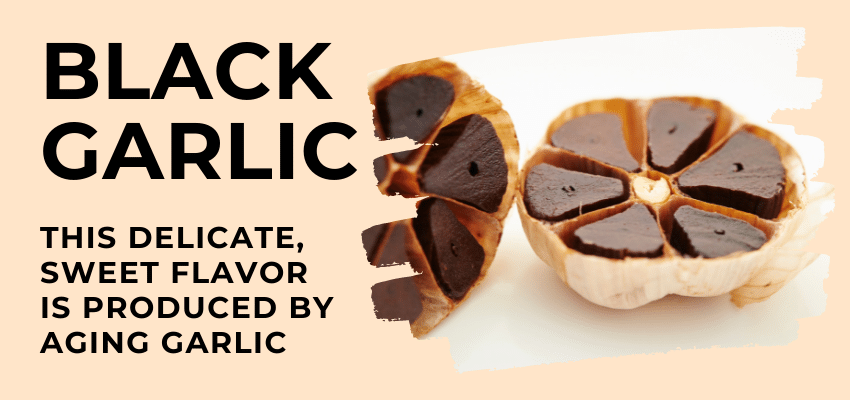
Black Garlic Is Really Better With Age
This delicate, mild and sweeter flavored garlic requires mostly patience. Simply age regular garlic bulbs over the course of weeks or months. It requires strictly regulated temperature and humidity to achieve its sticky consistency.
Black garlic contains more antioxidants and may provide more health benefits than raw garlic.
How to Grow Garlic In 7 Steps
Garlic is easy to grow and is a great crop for beginner gardeners.
With the large variety of garlic available, there is a variety that will be suitable to grow in any region. Garlic can also be grown in raised beds and containers. A little patience is needed when growing garlic because it takes 8-9 months to mature.
But the wait is well worth it to have homegrown garlic in your pantry. Here are the steps to get your garlic bed up and growing.
1. Choose the best garlic variety to grow based on where you live.
The first thing you need to do is find the variety or varieties of garlic that will grow best in your region, and what the best time to plant is for the variety you decide.
A chart of the climate zones and the recommended planting times is provided below, as well as a list of garlic varieties to consider. It’s best to plant your garlic in the fall from late September-mid October to allow the garlic to go through a dormant period where it’s exposed to cold temperatures, this process is called vernalization.
If you live in a cold climate, you will want to plant your garlic 3-6 weeks before your area’s first expected hard freeze. Usually Sept-Nov, this will allow the plant to grow a good root system before the ground freezes. For warm climates, you will want to plant your garlic 3-6 weeks before your area’s coldest time. Usually by early December.
2. Prepare the garlic bed.
Next, you will need to prepare your garlic bed. Garlic prefers to grow in full sun in a well drained soil, rich soil.
If you have clay soil, you will want to loosen it up a bit by mixing a 3-inch layer into the soil. This will loosen the soil to improve drainage, but also give the soil some extra nutrients.
3. Time to separate and get a little judgmental.
Now that your bed is ready, separate your garlic bulbs and choose the cloves the largest, plumpest firm cloves for planting. Be sure to not damage the papery skin on the cloves(garlic seed). Avoid using the smaller bulbs as these will produce small bulbs.
4. It's planting time!
To plant your garlic, dig a trench that’s 2–4 inches deep. Here’s a good way to know how deep your trenches should be, in warm climates you can dig a 2-inch trench safely and in colder climates you will want to dig a 4-inch trench.
To give your garlic seed a good dose of nutrients to use, put some worm castings under each of the cloves.
Place the clove with the pointy end pointing up. Place the cloves 4-6 inches apart to allow the plant plenty of room to grow. Each of your rows should be 6-9 inches apart.
Cover the trench with soil.
If you happen to live in an area that receives a lot of rain and is humid, you will want to place each clove 6 inches apart and your rows should be 9-12 inches apart. This is to increase the air circulation around the plants and reduce the risk of them developing a common fungal disease called rust.
5. Water the bed mindfully.
Water the bed to help settle the soil, but be sure not to overwater, garlic doesn’t like wet soil, it prefers a moist soil.
After watering, apply a 3-6inch layer of clean straw over the entire bed. In cold climates, stick to using a 6-inch layer of straw to help keep the soil warm, to give your garlic time to get a good root system started before the ground freezes.
6. Let's talk soil!
During the fall and winter, the soil only needs to be lightly moist. You can stick a finger into the top 2 inches of soil to test its moisture content and water if it feels dry.
It’s always important to not overwater garlic.
During the cooler moths, the soil will retain more moisture. Using a drip irrigation system for watering garlic, because you always want to avoid watering the leaves, you want the water to go to the roots. This is why the drip irrigation is the best option to keep your garlic happy.
In the spring, you can start watering again. You will want to give deeper, less frequent watering on a consistent basis, usually 2 inches of water once a week, unless the weather is warmer and the soil gets dry.
If you have chosen to grow a hardneck variety (more info on varieties below), you will notice scapes (stiff flowering stalks that grow from the center of the leaves) growing starting late spring to early summer. It’s recommended to cut these scapes off after they have formed one curl, to allow the bulbs to use all the energy to for big cloves.
Don’t throw those scapes away, they are delicious and make a tasty addition to any salad or dish.
7. About nine months later, it's time to harvest.
After waiting 8–9 months, it’s time to find out if it’s time to harvest your garlic. The best way to is to look at the leaves, when 50% of the leaves are green and 50% are brown (the leaves will turn brown from the bottom up).
This is the plant’s best sign to tell you it’s ready to go.
It’s a good idea to confirm its readiness, choose a bulb or two and gently digging around the bulb and to feel how big it is and be sure not to damage the papery wrapping around the bulb.
If the bulb is small, pat the soil back around it and give it a few more days and check again.
An important thing to note is to not wait until the all the leaves have turned brown. You want to harvest when there are still green leaves, as each green leaf is an indicator for how many layers of papery wrapping are on the bulb.
It’s also recommended to stop watering a week before you plan to harvest, this will allow the soil to dry a little, which will make it easier to remove the bulbs.
After you harvest your garlic bulbs, give them a gentle brush to remove any excess dirt that remains on the bulb. Be sure to never wash your bulbs and that the wrappings stay intact.
Some wrapping will fall off and that should remove most of the remaining dirt and the layers underneath will be clean.
Storing Your Garlic Safely
Never Refrigerate Your Bulbs
For any bulbs you’ll be using right away, you can use them fresh from the garden. Just cut away the leaves and trim the roots, then place your garlic bulbs in a wire basket and place in a dark, room temperature, dry area with good air flow.
A cupboard or pantry will work fine.
You never want to refrigerate your garlic bulbs, you should use your fresh bulbs within 3 weeks of harvesting.
Curing Garlic For Long Term Storage
To store your garlic for a longer time, you will need to cure it, which basically is letting it dry.
Curing will take 2 weeks to two months, if you’re in a dry/warm climate your bulbs should be cured in 2-3 weeks, and if you’re in a humid/wet climate it could take 2 months for your bulbs to cure. Once cured and properly stored, your garlic can store your garlic for several months.
You can tell when garlic is cured by checking the roots and leaves, if they are completely dry and stiff, they are cured.
To store your cured garlic, cut the leaves away and trim the roots, so they are 1/4-1/2 inch long using pruning shears then keep in a room temperature, dry area like a pantry or cupboard.
Always store your garlic in a breathable container, to allow the air to circulate around the bulbs. A wire or woven basket, the bags you get your onions or potatoes in, will work great.
You can even put your old pantyhose to use to store your bulbs, just place a bulb in, then tie a knot and place another bulb and tie a knot and continue until you fill the hose. Hang in your pantry or cupboard.
To remove a bulb, just cut under the next knot (just be sure too not cut into the knot above).
When using your stored garlic, be sure to save some of the largest bulbs. You’ll use these bulbs to start your garlic bed in the fall.
When using your stored garlic, be sure to save some of the largest bulbs. You’ll use these bulbs to start your garlic bed in the fall.
Freezing Garlic
You can also store your garlic by freezing it. You can choose to peel and freeze individual bulbs, or you can freeze a variety of chopped, minced and sliced cloves to have ready to go when needed. For individual cloves, place them in a freezer bag or container and spread them out so that they stay separate, after they have frozen, just pick out the amount you require.
When freezing the chopped, minced or sliced cloves, you can either place them in a freezer bag or container and spread it into a thin layer to freeze uniformly. This makes it easier to break off a chunk for cooking.
Alternatively, you can spoon the garlic into ice cube trays and freeze them. Once completely frozen, remove the cubes and put them into a container or freezer bag.
Types of Garlic & Their Varieties
There are two types of garlic and here is the difference between them. You can find the best variety of garlic varieties online, but soe are available in garden centers. You can also start saving bulbs from your own harvests.
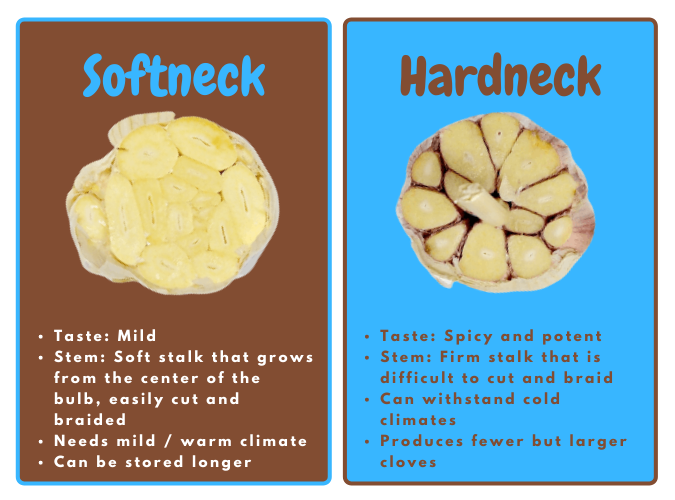
Softneck Garlic
These varieties are easier to grow and maintain. Are very productive and store longer. They don’t form scapes and grow best in warm climates in Zones 5 and above.
List of Softneck Varieties
- Silverskin - smaller, more flavorful, very productive and easier to dry and store. This variety is the one found in most grocery stores. Will store up to one year.
- Artichoke - rich garlic flavor, very productive. Will store 8-10 months.
Hardneck Garlic
These varieties have a stronger flavor and grow well in colder climates, making them a great choice for northern gardeners.
Hardneck varieties will grow stiff flowering With hardneck you’ll want to remove the scapes to let the bulb focus entirely on developing big cloves. This variety produces best in Zones 4 and below.
List of Hardneck Varieties
- Asiatic - Won't grow scapes in warm climates. Usually easy to grow and matures faster than other varieties. Varieties include: Asian Temptest, Korean Red, Korean Mountain, Japanese and Russian Red Streak.
- Creole - 4 to 12 cloves per bulb. May not grow scapes. Thrives in dry, hot climates. Stores up to one year. Varieties include: Ajo Rojo, Creole Red, Cuban Purple, Burgandy and Pescradero.
- Elephant Garlic - Not a true garlic but a member of the leek family. 5-6 cloves per bulb. Will grow scapes that can be eaten. Bulbs are easy to separate and cloves are easy to peel. Mild flavor.
- Glazes Purple Stripe - 8 to 10 cloves per bulb. Fairly hardy and not very fussy. Varieties include: Purple Glazer, Vekak, Brown Temptest, Blanak and Red Rezan.
- Purple Stripe - produces 8 to 12 cloves per bulb, easy to grow and matures later in the season. Stores up to 6 months. Varieties include: Chesnok, Persian Star, Red Grain, Shatili and Siberian.
- Marble Purple Stripe - produces 6 to 8 cloves per bulb. Does well in a wide variety of conditions and is great for home growers. Varieties include: Khabar, Wenger's Russian, Belarus, Northern Siberian and Metechi.
- Porcelain - 2 to 5 cloves per bulb. Hardiest hardneck making it great for beginner gardeners. Stores 8-10 months. Varieties include: Leningrad, Rasa Blanca, Great Northern and Majestic.
- Racambole - Considered to have the best and truest flavor, 8-12 cloves per bulb, and preferred by chefs. Not the easiest variety to grow, but well worth the effort. Peels easily. Varieties include: Spanish Rosa, Killarney, Island Rocambole, Klamath Wild, and Martin's Heirloom.
- Turban - 6-10 cloves per bulb. Might not grow scapes. Great choice for growers with short growing seasons. Varieties include: Basque, Uzbek, Thai Purple, China Stripe and Lotus.
Best Time To Plant Garlic According To Your Climate Zone
Climate Zone
Earliest Date To Plant
Latest Date To Plant
0 to 3
Late August to early September
Late September
3 to 5
Mid to late September
Mid to late September
5 to 7
Early to mid October
Early to mid October
7 to 9
Late October
November
9 to 10
Late October
December
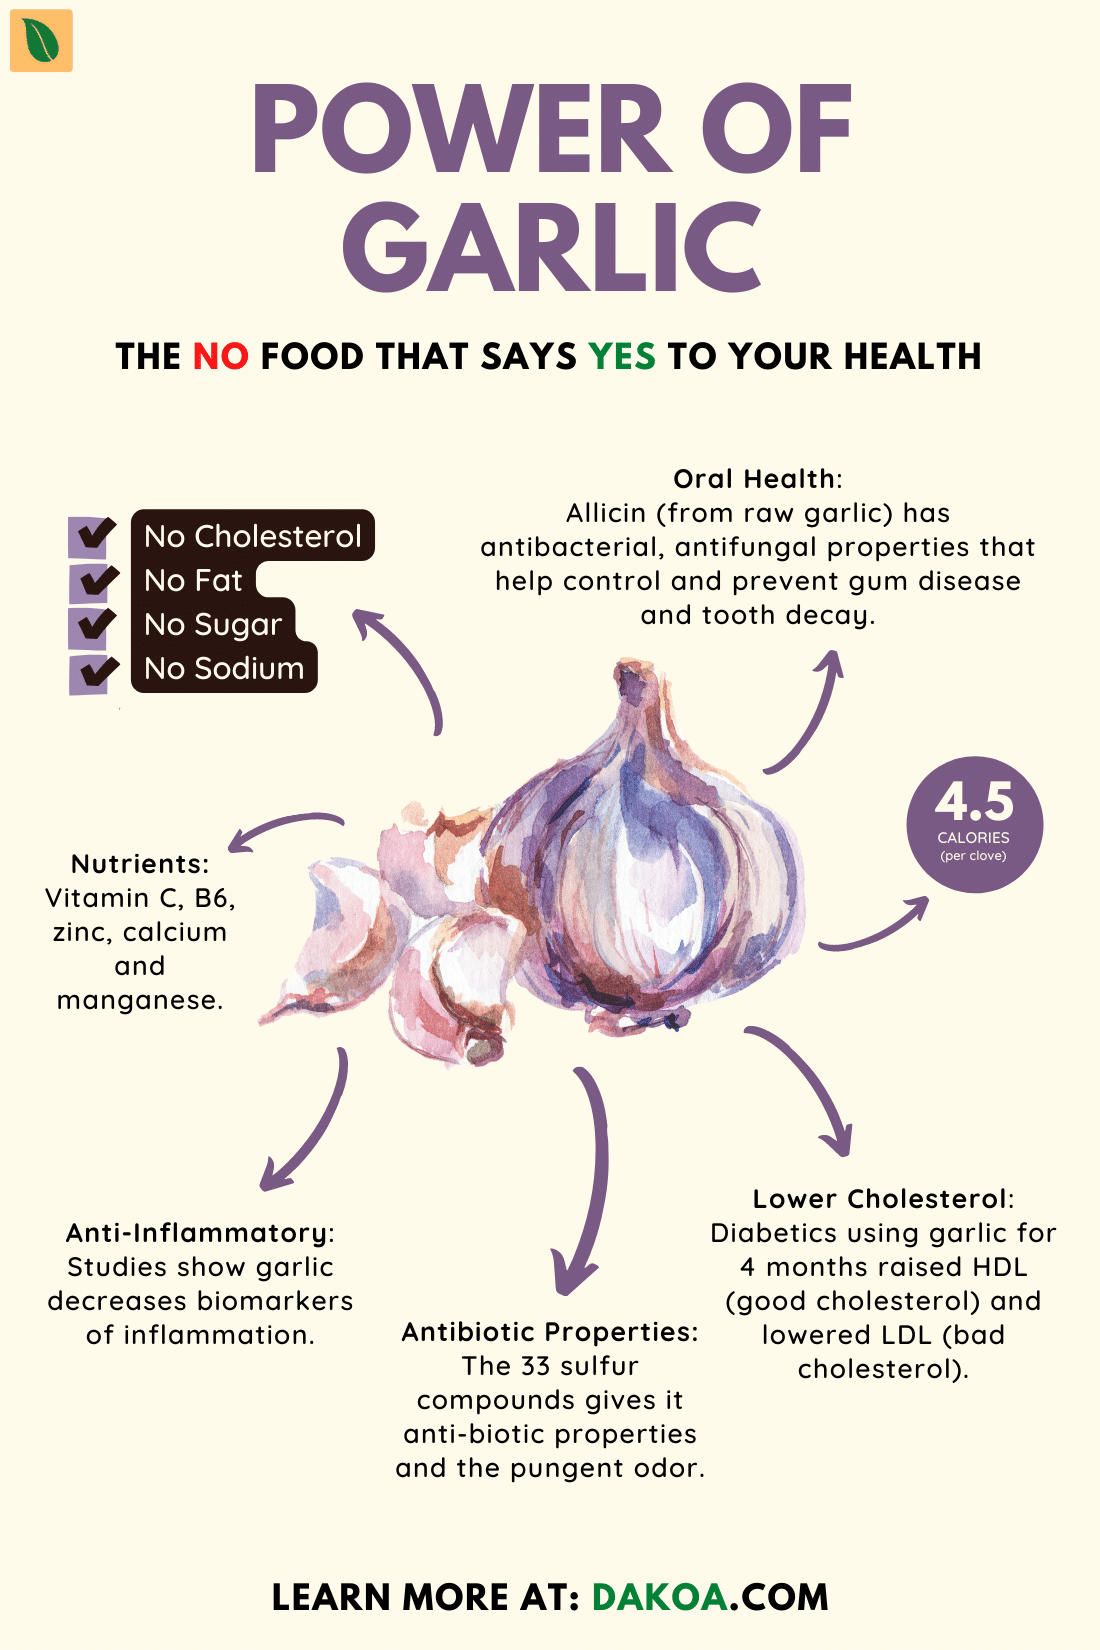
Power of Garlic Infographic
FAQ
After handling garlic, what’s the best way to get the smell off of my hands?
To get that pungent odor off of your hands, the best way is to use a stainless steel utensil or your stainless steel sink and rub your hands thoroughly, or you can make a paste of 2 parts baking soda and 1 part salt, and add water to make a paste and rub the paste into your hands and rinse well.
More To Discover
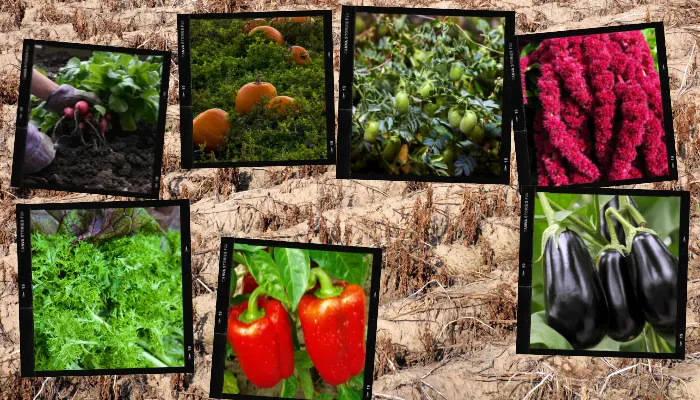
- 13 Most Beneficial Insects You Need in Your Garden and How to Attract Them
- Ultimate Beginner’s Guide To Raising Meat Rabbits in Your Backyard
- Grilling Your Garden: 9 Tips for Perfect Grilled Fruits and Vegetables
- Green or Black Tea? Be Your Own Supplier and Grow Both In Your New Flavorful Tea Container Garden – Indoors or Out
What’s the easiest way to peel fresh garlic?
The easiest way is to break the garlic bulb into cloves and place in a bowl with a tight lid or a mason jar and shake vigorously for at least 30 seconds, then remove the peeled cloves and continue to shake until all cloves are peeled. Throw away or better yet compost the peels.
Can I grow garlic in my container garden?
You most definitely can, garlic grows very well in containers, but be sure to choose the right variety for your climate. If you live in a cold climate, you’ll want to choose a hardneck variety. Whereas, if you live in a warmer climate, you’ll want to go with a softneck variety to get the best results.