


Ducks are adorable, entertaining, funny and lay incredible tasting eggs (a comparison between duck and chicken eggs is provided below). Maybe you’re thinking about raising a few in your backyard as pets while also enjoying fresh duck eggs, but you don’t know how to go about setting up a duck enclosure or taking care of them?
This guide will help you decide if raising ducks is something you really want to do, and if it is, how to do it.
The first thing you need to do before getting ducks is to check the local ordinances and regulations on keeping livestock in your area, and if you are in a HOA, check for any rules and regulations with them as well. You don’t want to get everything set up and find out that you aren’t allowed to keep ducks in your area.
You also should be aware that ducks are messy (very messy, they poop a lot) and can smell very quickly if they aren’t cleaned frequently, and if you don’t have a lot of free time to spend cleaning your ducks’ enclosure, you could end up having upset neighbors complaining about it to you.
Ducks also don’t like living alone, so you will have to keep and care for at least 3 ducks, and if well cared for can live up to 10 years and sometimes more.
The initial costs of setting up your duck house and yard can be costly, and the cost of feed, bedding and supplies may not be extremely high, but they will be an ongoing expense. It’s important that you do your homework before you bring any ducks home, it’s hard enough to rehome a dog or cat, let alone ducks.
It’s important that you gather all your supplies and have the enclosure set up and ready before purchasing any ducklings. This includes an inside brooding area and the outdoor house and enclosure, ducklings grow very fast and will be ready to go out into their outside home in no time.
Now that you know that you can have ducks in your backyard and are willing and able to care for them, you need to take a look at your backyard and choose where you want to put your duck enclosure, one consideration to keep in mind is to place the enclosure close to a water source or have a hose long enough to reach it, because you will need to maintain and clean the enclosure.
Measure the length and width of the area you want to use for your duck enclosure, you will need these to when choosing the house and supplies you will need.
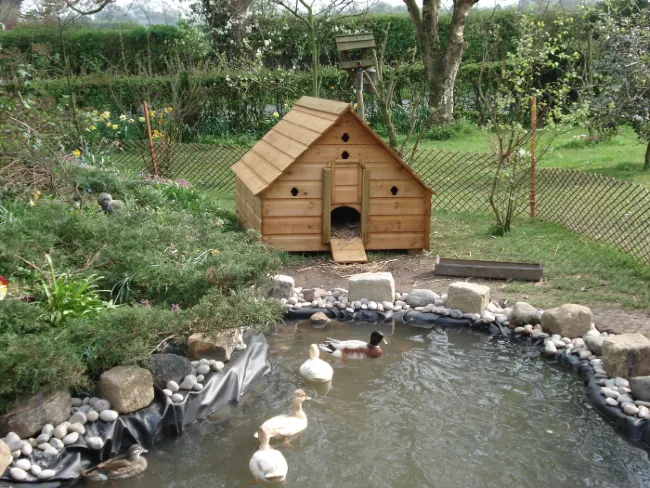
THE DUCK HOUSE AND ENCLOSURE
The size of the duck house and enclosure will depend on the measurements of the space you have available in your yard and once you know how big of a house/enclosure you will have, will let you know how many ducks you can keep.
Remember, ducks shouldn’t be kept alone, and you will need to house at least 3.
Preferably, the duck house should be on ground level, but if you do have an elevated house, be sure that a ramp is installed at the door for the ducks to use to get in and out easily.
Ducks also don’t roost, so the house only needs to be 3 feet tall. You will want to close your ducks in the house at night, unlike chickens they won’t seek out a place to roost for the night, so to keep them safe, you will have to put them inside yourself.
Each duck will need 4-5 square feet (2 feet x 2 or 3 feet) of floor space (ducks don’t roost) in the duck house, you can build your own duck house (there are designs and instructions available online) or you can purchase a duck house from a farm supply store or online.
If your space and budget allow, you might consider getting a house and enclosure that will hold a few more ducks than you initially wanted, because you will likely want to add more down the road.
Be sure your duck house has good ventilation to help keep it dry, ducks produce a lot of moisture and without good ventilation, mold will grow, and it will cause illness in your ducks and can kill them.
Also, the roof of the house should be hinged so that it can be lifted open to gather eggs and make cleaning easier.
When you have your duck house, you will need to predator proof it, cover all windows, ventilation or other small openings with hardware cloth attached using screws and washers, this will let air in and out, but keep predators out (even small holes will allow predators or rodents access).
It’s also recommended to replace any door latches with a secure latch that will prevent cleaver predators like raccoons from figuring them out.
There are some latches on the market designed for this problem.
If your duck house has a wood floor, it’s recommended to place linoleum tiles on the entire floor to help protect the wood from moisture and make cleaning the house easier.
There are a lot of opinions on the best bedding to use with ducks, both inside the house and out in the enclosure, the top three choices are straw, large flake pine shavings and sand with smooth pea stone, the best way to decide which will work best for you is to look at each option, and find the one that will work best for the climate in your area and with your budget.
Never use cedar shavings, these are harmful to your ducks.
The bedding in the house should be spot cleaned daily (removing dropping clumps) and completely changed at least every 2 days, unless you are using the deep litter method (there are instructions on how to use this method available online).
When you remove all the bedding, be sure to clean the floor using a bleach solution (1 cup unscented bleach to 1 gallon of water). Using this solution will help keep bacteria and mold from developing. Make sure the floor is completely dry before adding new bedding. Don’t forget to check through the bedding for eggs after you let the ducks out in the morning, as they tend to lay their eggs around sunrise.
If using straw or pine shavings (even a mix of the two), you might consider having a compost bin in your backyard to provide a way to dispose of the soiled bedding, because there will be a lot of it, having a compost bin will save you from having many trash bags of bedding waiting for trash pick up, plus any kitchen food scraps, cardboard and paper, and you will be rewarded with a very beneficial compost (duck poop makes great compost material) to nourish your lawn, gardens and potted plants. It really is a win, win option.
It’s best to keep food and water containers outside the house, to keep the house drier as well as reduce food waste (the food could get damp).
DUCK ENCLOSURE
The duck enclosure will have to provide a minimum of 15 square feet of space for each duck, if possible more is always better, ducks are larger than chickens, they have a larger wingspan and need more space to flap those wings.
Even though the majority of domestic duck breeds don’t fly, it’s recommended to have a roof over your enclosure, to provide shade, protection from weather, and predators.
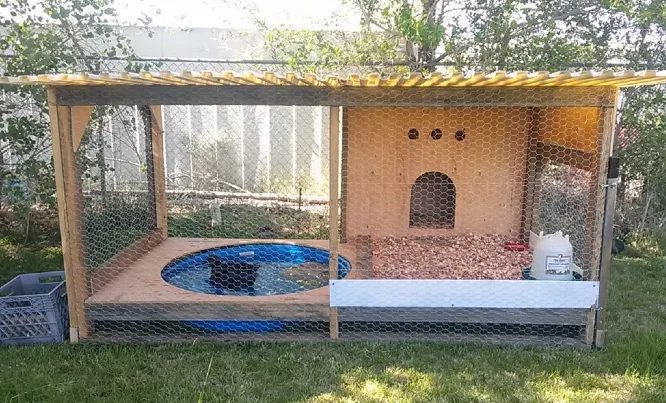
Now, if a roof isn’t possible, the enclosure should at least have a secure cover of hardware cloth or fencing. You’ll also want to dig a trench about an 1–2 inches deep 18 inches on the outside perimeter of the enclosure and 18 inches on the inside perimeter of the enclosure (it never hurts to make it wider) and place hardware cloth in the trench and cover with soil, this will keep predators from digging under your enclosure and getting your ducks.
Be sure to use carabiners on any gate/door latches to keep predators from opening them (raccoons are really good at figuring out latches). Check the entire enclosure inside and out for any openings (snakes and small predators can fit through very small openings), and cover them with hardware cloth to prevent predators for getting through.
The bedding you use in the enclosure is the same as the one you choose for your duck house, just find the one that works best for you. The enclosure should be spot cleaned at least once a day (remove dropping clumps or any heavily soiled areas) and depending on the bedding you use, it should be entirely cleaned frequently to keep the smell under control and reduce the amount of flies.
Keeping your ducks enclosure clean is very important for your ducks’ health. If your enclosure doesn’t have a roof, you will want to have some shady areas for your ducks to shelter from the sun, you can plant some bushes, like small evergreen bushes, juniper, blueberry or butterfly bushes inside the enclosure and some trailing or climbing vines, like roses, nasturtium and grapes on the outside.
You will want to place patio pavers to medium-sized smooth stones around the base of any bushes that you plant inside the enclosure to protect the roots from the ducks (they will root around them).
Another idea is to grow trays of fresh grasses for your ducks to nibble on, get some plastic trays, fill with organic potting soil, and plant a blend of rye, wheatgrass, or millet and once they have grown, place the tray in with your ducks and let them enjoy grazing, then reseed. It’s a good idea to have at least 4 trays, so you can have a couple that are grown and ready to use and a couple that are growing as replacements.
Your ducks will need a water source other than for drinking, ducks need to submerge their entire heads in order to clean their eyes and nares (nostrils) and also to bathe and preen.
You can use a plastic child’s wading pool with some smooth pea stone placed in the area where you’ll keep the pool. This will keep the area from getting too muddy. You also need a sturdy ramp for your ducks to use to get into the pool.
The water should be changed at least once a day (it will get dirty fast), keeping the water fresh is important for the health of your ducks, stagnant/dirty water is a breeding ground for bacteria.
Ducks love the water, and having a place to swim around and splash is a great way to give them enrichment and keep them active.
As a treat, try placing some shredded dark leafy greens (no spinach) into the water for your ducks to fish out.
You will want to keep the duck food and water containers in a sheltered area in the enclosure (to keep the food and water out of the sun as well as keep the food dry). There are several types of feeders and waterers on the market, but it’s important to find one that is designed for ducks, ducks will empty food and water dishes and stand in them (they will poop in them), so it’s best to get gravity type feeders/waterers made for ducks, this will save you money on food(less waste) and constant runs outside to fill the water bowl.
You can purchase feeders/waterers at a farm supply store or online. The water container should be changed and filled daily, and the food container should be refilled as needed. Be sure the water container is kept at least a couple of feet away from the water container to prevent it from getting wet when the ducks drink, anytime the food gets wet you need to remove it promptly to prevent it from becoming moldy.
FEEDING YOUR DUCKS
Ideally, you will want to feed your ducks a high quality, nutritionally complete diet made for ducks, these diets have the proper amount of niacin that ducks require for proper bone health and growth, as well as the protein levels they need.
A lot of people choose to feed chick starters and chicken layer feeds, which is perfectly fine, but it’s important to add a niacin supplement to the feed (you can add brewer’s yeast, adding 2–3 cups for every 10 pounds of feed), this will be needed for your ducks entire life.
Also, never use a medicated chick starter for your ducklings, the medication is harmful to them. Good nutrition is a necessity for your ducks health and for the quality of the eggs she will lay, if she isn’t receiving a good diet she will be more susceptible to health issues and egg production and quality will decrease.
Here is the recommended schedule for what to feed your ducks for each stage of growth:
-
- Duckling Crumbles 20-22% Protein- Hatch to 2 weeks
- Duck Starter/Grower 18-19% Protein- 2 weeks to 18 weeks
- Duck Layer Pellets 15-18% Protein- 18 weeks and older
You will need to provide a separate dish with grit and crushed oyster shells (for extra calcium for strong eggshells) for your ducks, the grit is necessary for proper digestion and the oyster shells are for strong eggs shells, be sure these are available at all times.
You can give your ducks treats, but be sure they only make up about 10% of their daily diet to ensure that they are primarily eating the duck feed. They will enjoy dark leafy greens (no spinach), vegetables, fruits (limit to small amount due to high sugar content), Lettuces (no Iceberg), mealworms, crickets and earthworms.
WHERE TO GET YOUR DUCKS
You will find ducklings every spring at farm supply stores, but these will tend to be only one breed and unless someone there is experienced in sexing ducks, you could end up with most if not all males, and since you are interested in keeping ducks for eggs as well, you will need females, so it’s best to purchase your ducks from a poultry/fowl breeder.
You can find a reputable breeder online, such as McMurray Hatchery, Meyer Hatchery or Stromberg’s, these farms offer sexed ducklings (so you will almost always receive females, very rarely a male might be sent) of various breeds (a list of the best ducks for laying eggs is provided below), so you will be sure that your flock are all girls and a breed that are more prolific layers.
Purchasing from one of these farms will cost you a little bit more, but you at least will know what sex and breed of duck you are getting.
BROODING DUCKLINGS
It’s best to have your brooder set up before you bring any ducklings home, this will give you time to make sure that the temperature is correct and that you have everything ready for your new ducklings arrival, less stress on them and on you, no last minute runs to find something you are missing.
Most ducklings are 1-2 days old when they are sold, and will require a brooder for the first 7-9 weeks, to provide the warmth they need until fully feathered.
You will want to keep your brooder in a draft free area and away from other pets.
The area where you keep your brooder should never go below 50 degrees F. The brooder temperature should be 90-95 degrees F for the first week and decreased by 5 degrees each week for their first 3 weeks, after that, as long as the room temperature is steadily 70 degrees F, they will no longer need the brooder plate.
A plastic swimming pool makes a great brooder for ducklings and can easily be cleaned (it will need to be cleaned often), place 2 inches of large flake pine shavings (never use cedar shavings these are harmful to your ducklings) or recycled newspaper bedding (such as Carefresh) on the bottom of the pool.
Your ducklings will need to be kept warm! You can easily do that with a brooding plate (available at farm supply stores and online), be sure to adjust the height of the brooding plate to allow your ducklings to get under it and be able to touch it, as well as move freely from under it.
If your ducklings are huddled together and making a lot of noise, you might need to lower the plate a bit, this is usually a sign they are cold. You will want to bring each duckling to the brooder plate and encourage them to go under it, so they know where to find warmth, you might have to do this a few times.
Never keep the water source near the brooder plate or allow the bedding under it to become wet, this is an electrical device.
The bedding should be spot cleaned at least once daily (preferably more), by removing any clumps of droppings or wet areas, and add more bedding and the bedding should be completely changed at least once a week or more often if it becomes wet.
It’s very important to keep your brooder clean and dry to keep your ducklings healthy and dry (if they become wet, they can get chilled). Ducklings are messy, so it’s better to be too clean, than not clean enough.
You should have food and water available for your ducklings at all times. It’s recommended to use a water/feeder made for ducklings (available at farm supply stores or online), these are designed for the shape and size of a ducklings bill, and prevent them from getting into, standing and pooping in their food and water source.
These will save you some time and money, by reducing food waste and constant water changing, wet bedding and ducklings. When you first bring your ducklings home, you need to show each one the feeder and waterer and dip their bills into each, and then watch closely to be sure they are eating and drinking.
Ducklings can be allowed short swim times in a shallow tub, sink or container with lukewarm water after they are 1 week old (not before), always supervise your ducklings when they are swimming and keep the time short.
You want to make sure that your ducklings are warm during and after swims, and should be dry before returning to the brooder.
Once your ducklings are 2-3 weeks old and the outside temperature is above 60 degrees F, you can take them outside for a little supervised play time, it’s recommended to make a fenced (doesn’t have to be expensive or elaborate) play yard for them to explore in, you can make something out of some wooden stakes and hardware cloth or window screening, it just needs to be high enough to keep the ducklings in, this can easily be moved to different areas.
Also be sure that the yard isn’t treated with any chemical pesticides, herbicides or fertilizers.
Always supervise the outside playtime to be sure your ducklings are safe from predators, they are easy prey for both wild predators and domestic ones (cats and dogs)
During the time your ducklings are in the brooder, you will want to make sure they are eating, drinking, active, clean and dry, they are very fragile for the first few weeks, so you need to be vigilant to avoid losing your ducklings.
Once your ducklings are 7-9 weeks old, they are ready to go outside, but be sure the nighttime temperature is staying above 50 degrees F.
It’s recommended to acclimate your ducks over a few days to living outdoors, increasing the time they spend outside each day, be sure to keep an eye on them to ensure they are eating, drinking and being active, and always close them in the duck house at night.
KEEPING YOUR DUCKS HEALTHY
As a duck owner, it’s important to keep track of your flocks’ health, so you will want to become familiar with duck anatomy, diseases and their treatments.
A list of the signs of illness in ducks is provided below, as well as a list of the common health issues in ducks, you will want to look at each disease and the treatment for it so if you notice any symptoms in one or more of your ducks, you will know what you will need to do in order to treat them.
A list of what you need to have in a first aid kit for your ducks is provided below.
Animals are very good at hiding illnesses, so when you do notice they have symptoms, they are already pretty sick, so it’s important to do daily visual checks on your flock for any signs of illness or injuries, you should do a more thorough exam (picking each duck up and exam her from head to toe), look for any discharge/swelling in eyes and nares (nostrils), body for any swelling or wounds, thinness, or parasites or dirty vent (rear end).
Handling your ducks from an early age will make it easier on both of you when you have to do an exam.
Check the local listings of veterinarians in your area that specialize in birds or that have experience treating livestock, keep a few numbers on hand in case of emergency.
It’s recommended to have a quarantine cage on hand in case you do have to treat one of your ducks for anything, this cage should be kept in an area far away from your ducks enclosure and be in a warm (about 80-85 degrees F), draft free area away from other pets. The cage should be large enough for the duck to move around easily, and hold a food and water container. You can build a cage using hardware cloth on a wood frame, or you can use a wire dog crate.
You can use newspaper or pine shavings as bedding in your quarantine cage, and you will want to spot clean it at least once a day (more if possible) and totally change it every 2–3 days, it’s very important that you keep the treatment area very clean, using a bleach solution (1 cup unscented bleach per 1 gallon of water), to wipe the cage down when cleaning, be sure to thoroughly dry before replacing the bedding.
When you are treating a duck, you will want to have a pair or two of coveralls or spare sets of clothes, to wear over your clothes, so they can be easily removed and cleaned after treatments to keep the risk of transmitting the disease to the rest of the flock.
Be sure to always wash (even though you wear gloves) your hands and arms after any treatments, any protective measures you take when you have a sick duck will help protect the rest of the flock.
You should thoroughly disinfect the quarantine cage and area around it after your duck is done with treatments. Hopefully you will never need to use your quarantine cage, but it’s better to have it on hand if the need for it comes along.
LAYING DUCKS
Female ducks will usually start laying eggs when they are 6–7 months old, and the first eggs will most likely be small and increase in size as she lays more eggs. Ducks will lay eggs year round, and don’t require supplemental lighting during the winter months in order to lay eggs.
The first year will be your ducks most productive egg laying time, and it will decrease over the years, most ducks will lay eggs well for 3–5 years and stop completely when they are 7–9 years old. If you want to keep enjoying duck eggs, you will want to add some new females before your ducks reach the age that they stop laying or if you want to increase the amount of eggs available to you as your ducks slow down.
Since most people become very attached to their ducks and don’t want to even consider rehoming them, it’s important to have a plan in mind when it does come time to add new ducks, be sure you have a house and enclosure that is large enough to keep more birds, that you are permitted to have more ducks than you already have and that if you don’t have a large enough enclosure, do you have the space and money available for another enclosure.
Having a plan will save you time and stress when that situation arises.
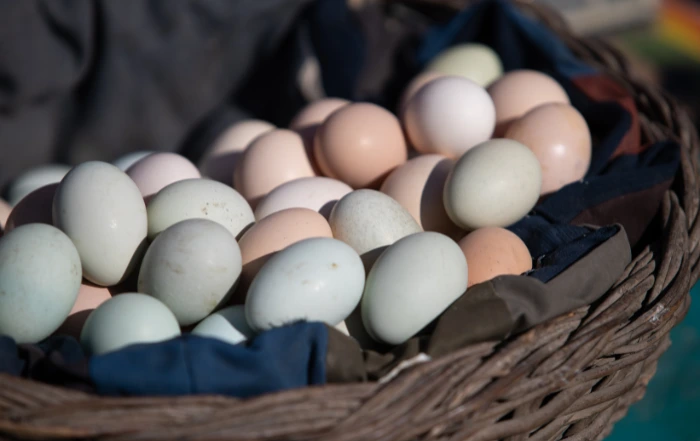
Comparing Duck & Chicken Eggs
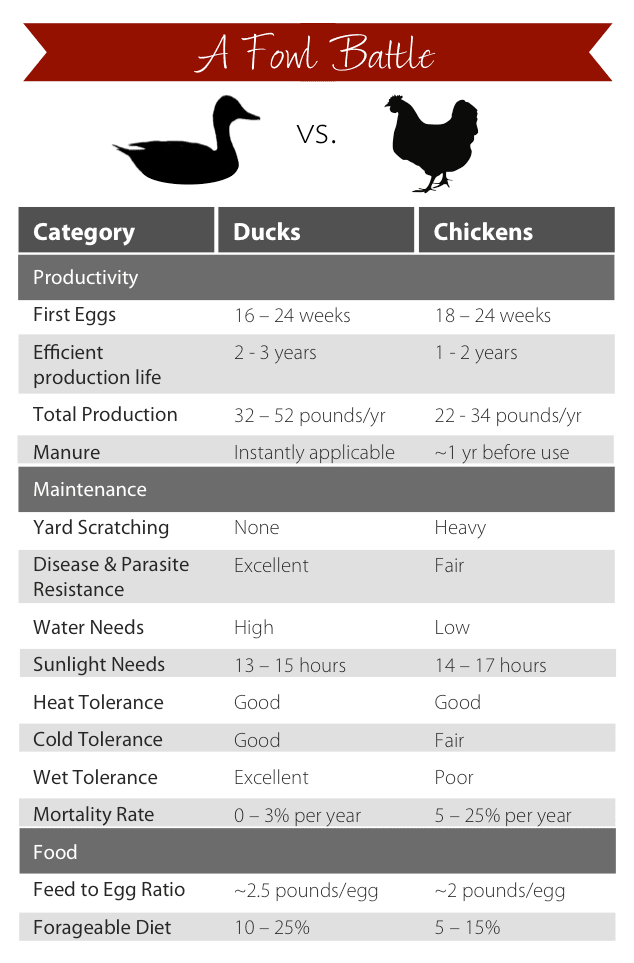
Duck eggs have a richer and more intense flavor than chicken eggs and are 50-100% larger.
They are higher in fat, but lower in water content, so they are great for baking.
More To Discover
- From Plastic Fantasies to Environmental Realities: Behind the Curtain of Corporate Greenwashed Promises
- Seaweed Farming for Carbon Dioxide Capture Poses Ocean-Sized Challenges in Scaling Up
- The Buzz of Bee Farming: Harnessing Nature’s Bounty of Wax and Honey
- Lab-Grown Oil: The Next Frontier in Sustainable Food Production?
To substitute eggs in a recipe, it’s recommended to use 1 duck egg for every 2-3 chicken eggs, depending on the size of the chicken eggs.
You want to make sure to not overcook duck eggs, this will cause them to be rubbery.
BEST EGG LAYING DUCK BREEDS
-
- Khaki Campbell – about 340 eggs per year
- Pekins – about 200–250 eggs per year
- Ancona – about 240 eggs per year
- Indian Runners – up to 300 eggs per year
- Magpies – about 290 eggs per year
- Welch Harlequin – 300 plus eggs per year
- Buff Orpingtons – 200–250 eggs per year
DUCK HEALTHCARE
Signs of Illness in Ducks
-
- Hiding more than usual
- Changes in activity level
- Labored breathing
- Wheezing or coughing
- Discharges from eyes, nares (nostrils) or mouth
- Paleness
- Weight loss
- Changes in eating and drinking habits
- Strong or foul odor
- Immobility
- Limping or swelling in feet or legs
- Hunched or standing rigid
- Headed tucked back
- Abnormal wing position
- Ruffled feathers
- Dirty vent (rear end)
- Abnormal droppings
- Sudden drop in egg production
- Avoiding the rest of the flock
- Being bullied
Health Issues in Ducks
-
- Duck Virus Hepatitis
- Duck Plague (Duck virus enteritis)
- Riemerella Antipestifier Infection
- Avian Cholera
- Colibacillosis
- Aspergillosis
- Aflotoxin Poisoning
- Botulisum
- Sticky Eye/Eye Infection
- Foamy Eye
- Bumble Foot
- Impacted Crop
- Prolasped Penis/Vent
- Wet Feather
- Wry Neck
- Angel Wing
- Spraddle Leg
First Aid Kit for Ducks
-
- Disposable Medical Gloves
- Gauze Pads (non-stick)
- Eye Dropper or Syringe
- Small Scissors
- Bandage Scissors
- Vet Wrap
- Antibiotic Ointment (without pain relief)
- Vetricyn Poultry Care Spray
- Styptic Powder
- Small Dog Nail Clippers or Cat Nail Scissors
- Saline Solution
- Old Towels and Wash cloths
- Coveralls or Old Clothes