


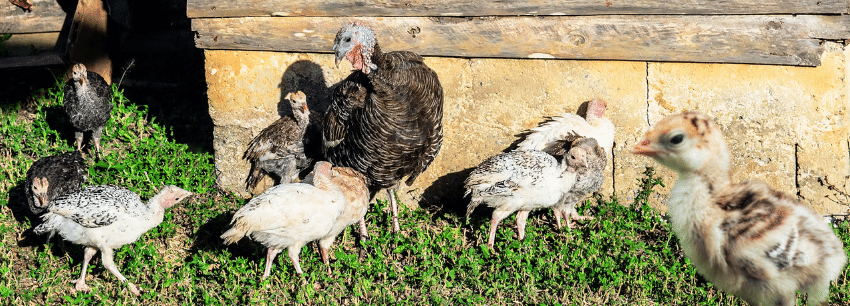
Heritage turkeys are beautiful, interesting, docile breeds that behave more like their wild ancestors. They can breed naturally, they are more productive, will brood their eggs, are more disease resistant, and they taste better than the broad-breasted variety we are used to.
Yes, the broad-breasted variety does provide a larger amount of breast meat and reach harvest size faster (14-16 weeks), but they can’t breed naturally, and they can’t compete with the flavor the heritage breeds provide.
A heritage turkey is definitely worth the extra time it takes to raise them (26-28 weeks), so if you want to provide your family with a turkey that tastes how a turkey should taste, use this guide to get started.
I’ve included a list of heritage turkey breeds below.
Before you get started, check all the local ordinances, rules and regulations regarding raising livestock in your area. Better to know before you start!
Selecting Where Your Turkeys Will Be Housed
Now that you know you can raise some heritage turkeys, take a look at your yard and find the area you want to place your coop and exercise run.
Keep in mind, when deciding on a location, that each turkey will require at least 6.25 square feet of space in the coop and 25 square feet of space in the exercise pen.
Take measurements of the length, width and height of the area you want to use, these measurements will help you when it comes time to choose how many turkeys you can keep.
A lot of first timers will start with 2 hens and 1 tom for breeding (turkeys should always be kept in groups), but will make the coop and pen larger, so they can add more later down the road.
Even if you don’t plan on increasing your flock, it’s best to provide your birds with as much space as you can.
It’s important to have your coop, pen, brooder and all of your supplies set up before bringing any poults (baby turkeys) home. This makes things a lot easier for you as well as for your turkeys.
Housing Your Turkeys Comfortably & Safely
Now that you have chosen your location, you need to decide on what type of coop and exercise pen you want to use. There are several designs available online and great tutorials on how to build your own.
Of course, you can always purchase them online or in farm supply store.
Be sure to use the space requirements for each bird that is provided above, it’s important to give your birds the space they need to thrive both physically and mentally.
Heritage turkeys are more active than the broad-breasted variety, so they need to have as much room as you can give them.
Also, if you think you might want to add to your flock over time, it’s best to build your coop and pen as large as your space and budget will allow, making expansion easy.
Turkeys need to roost at night (always close your turkeys in the coop at night and let out in the morning). This means they need to have a roosting bar in their coop.
Each turkey should have at least 15 inches of space on the roosting bar.
You can use a 2×4 placed with the wide side facing up but be sure to sand the wood smooth to remove any splinters and round the edges, to prevent foot problems or injuries.
Using a U shaped bracket to mount the bar, will keep it secure but allow you to remove it easily for frequent cleaning.
The bar should be at least 24 inches off the ground. It’s recommended to mount a dropping board underneath the roosting bar to catch the droppings. This also makes cleaning the coop much easier.
Mount the board, so it can be removed daily for cleaning. Putting linoleum tiles on the board will help protect the wood and make cleaning the board easier.
The roosting bar and dropping board should be removed and cleaned daily.
You can use a putty knife to remove droppings from the roosting bar and dropping board and wipe them down using a bleach solution (1 cup of unscented bleach to 1 gallon of water). Be sure they are completely dry before putting them back in the coop.
Large flake pine (never use cedar) shavings or recycled newspaper bedding such as Carefresh can be used as bedding in the coop and nest boxes.
The bedding should be spot cleaned daily by removing any dropping clumps and completely changed at least once a week
Turkeys are very sensitive to the amount of ammonia (it will cause respiratory problems) in the coop, so you must never allow droppings to accumulate.
Keeping your turkeys environment clean is important for your birds’ health. And it will reduce flies and other pests, as well as keep odors under control.
If you are going to breed your turkeys, the hens will need nest boxes.
Make sure the coop is draft free, as poults are very cold sensitive and a drafty coop could cause you to lose some or all of your new young.
Place a 2-3 inch layer of pine shavings or recycled paper bedding in the nest box and hang a curtain for privacy to give your hens a comfy place to lay and brood their eggs.
Make sure to spot clean daily and after the poults hatch, change the bedding and clean the box to remove the shells and give the new poults a fresh clean environment.
You’ll definitely need to spot clean the nest box at least once a day, it’s very important that the poults are raised in a clean environment to reduce the risk of disease, health issues and pests that will be attracted.
The exercise pen will need to give each turkey at least 25 square feet of space to allow them a place to scratch, run, and have fun. Always try to give your birds as much space as you can.
Take a look online at the different bedding and substrate options for outdoor turkey pens, find the one that will work best for your climate and budget.
Of course, you’ll need to spot clean the pen daily as well. Cleanliness is critical; a dirty environment is bad for the health of your birds, yourself, your family and the public.
A dirty coop and pen allows harmful bacteria and molds to thrive, harbors disease, attracts pests and smells bad.
It’s a good idea to set up a compost bin or worm bin in your backyard to dispose of soiled bedding from the coop and exercise pen.
Having one has many benefits for you and the environment. It saves the hassle of bagging it up, you get free compost for your yard and garden, free worms for turkey treats and reduces the amount of trash in landfills, so please consider adding one.
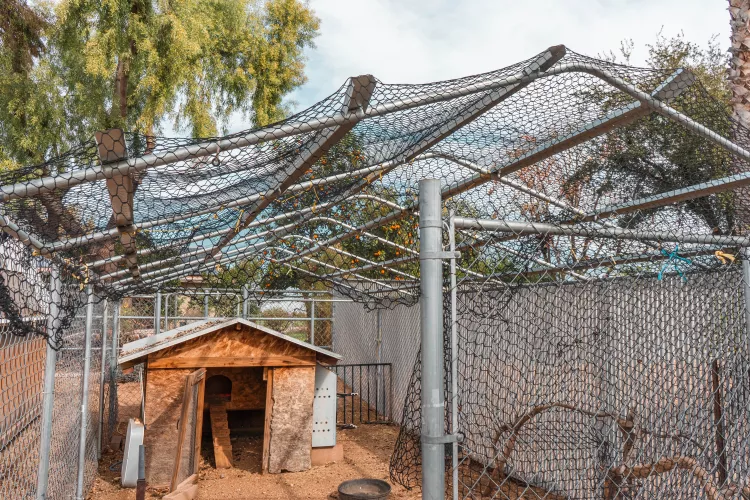
It’s recommended to place a roof on your pen. This will allow your turkeys to spend more time outdoors (protection from rain, snow and sun), keep the turkeys in (yes, heritage turkeys can fly) and keep predators out.
If you can’t place a roof on your pen, you will need to completely cover it with hardware cloth.
Making the exercise pen more enjoyable for your birds is a great way to keep them active, happy and healthy. This doesn’t have to be expensive.
You can plant a group of ornamental grass or bushes in each corner to give your birds a place to hide if frighted.
You can add some shade and a place to hunt for insects. And you can grow some climbing plants like honeysuckle, climbing roses and ivy on the fencing along the outer perimeter of the pen.
This will provide shade and give them a sense of security.
Turkeys will also appreciate a few tree branches (large enough to support the weight of the turkeys). They love to roost, after all.
Giving our birds a few enrichment items like some small hard plastic balls, child’s xylophone, ladders, stumps and a whole apple, summer squash or zucchini and a dust bath (dust bathing is important for the health of your turkeys skin and feathers).
Dust baths are crucial and so easy to make.
You can build a box or use a container that is large enough for your turkey to get into and flop around. Fill it with construction sand and make a shelter to place over it to keep the dust dry.
Try to add something new regularly, try to keep things interesting.
It’s essential to predator proof your coop and exercise pen. Predators are found even in busy cities, so take every precaution possible to protect your birds.
Predators can be domestic (dogs and cats) or wild (birds of prey, raccoons, coyotes) and they are very determined and will do whatever they can to make a meal out of your turkeys.
Use predator proof latches on all gates, doors and windows (raccoons can figure out how to open latches).
Install hardware cloth on all windows and vents using washers and screws, and be sure to seal any small openings in the coop.
To prevent a predator from tunneling or digging into your coop, bury hardware cloth around the entire perimeter. If your coop has a dirt floor, attach hardware cloth to the entire floor space securing it to the walls and cover with a layer of dirt (to help prevent predators from digging under).
It’s recommended to use hardware cloth and not chicken wire when building your coop and pen. Hardware cloth is sturdier and will be better at preventing predators from getting in.
Feeding Your Turkeys
Turkeys require more protein than chickens, so you need to feed your turkeys a turkey or game bird feed. This feed is designed to be a nutritionally complete and fortified diet and should make up the majority of your bird’s diet.
Here is the recommended feed for each stage of growth for your birds. You can find these feeds in farm supply stores or online.
- Hatch to 6 weeks – Turkey or game bird starter crumbles -(28-30% protein)
- 6 weeks to 5 months – Turkey or game bird grower (22-24% protein)
- 5 months and up – Turkey or game bird finisher (20-22% protein) or maintenance for breeders (18% protein)
Food and water must always be available to your turkeys, and the feeder/waterer should be kept out in the pen and not in the coop. This keeps the coop drier and reduces cleaning time.
You can offer your turkeys treats but don’t exceed 10% of their diet.
Healthy nutritional foods such as dark leafy greens, winter squash, pumpkin, zucchini, summer squash, apples (no seeds), berries, whole oats, cracked corn, barley, crickets, mealworms, and earthworms (this is where having a worm composting bin comes in handy, plenty of free protein rich worms for your birds).
You can even use shallow plastic trays filled with organic soil and plant wheatgrass, oat grass and rye.
Let the trays grow, put the tray in the pen and let your turkeys pick through it, after they are done, replant the tray, they will love it.
It’s probably best to have at least 3–4 trays growing at different stages (plant them about a week apart), so you always have a tray ready to give to your turkeys.
Remove any uneaten fresh foods after 2 hours to prevent spoilage and keep pests away.
Your turkeys should always have a dish of grit available. This is required for proper digestion. If you’re breeding your turkeys, a dish of crushed oyster shells should also be available to give the hens extra calcium for stronger eggshells.
Gravity poultry feeders and waterers are recommended for turkeys. These keep food waste down and water from becoming soiled with debris.
If you use dishes, you’re just asking for trouble and a lot more work for yourself.
Dishes allow the turkeys to stand in the food and scratch it out and poop in it. Even the water will be filled with debris (they also pose a drowning risk to poults).
Placing the feeder/waterers on a raised surface, you can use patio blocks stacked (duct tape the blocks together to keep them from sliding apart) or you can build an adjustable shelf that will allow you to raise the shelf as the birds grow.
This keeps the birds from having to lay down to eat and drink and will also help keep the feeder/waterer cleaner.
If your pen doesn’t have a roof, be sure to build a carport (smaller version) to place over the containers to keep them out of the sun and any wet weather.
The feeder needs to be refilled often and cleaned at least once a week. And be sure to dispose of any food that becomes wet, as it will mold quickly and get your birds sick.
Refill the waterer as needed throughout the day, and clean every other day to prevent bacteria and algae from forming.
If you are letting your hens brood and raise poults in the pen, you might consider placing a chick /poult gravity feeder on ground level for the poults to give them easier access to the food and water.
Having a separate feeder will also allow you to give the poults a starter feed for the first 6 weeks and keep your adult birds on their maintenance feed.
After 6- 8 weeks you can give the poults a larger feeder/waterer with grower feed in it and use an adjustable shelf you can raise as they grow.
Where Do I Get My Heritage Turkeys?
You’ll need to purchase your heritage turkey poults from a poultry hatchery, there are several online with strong reputations:
-
- McMurray Hatcheries
- Meyer Hatcheries
- Stromberg’s Hatcheries
Hatcheries will usually offer turkey poults in the spring. Be aware that most hatcheries will only ship poults in groups (often 6 or more). This is necessary as the small group is needed to ensure the poults stay warm enough during shipping.
Turkey poults will not be sexed at purchase (turkeys can’t be sexed until they are over 3 weeks of age, this is when males will start to strut), so keep that in mind when ordering your poults.
It’s a game of chance at this point.
You could get all hens in one batch, so you might order extra (if you have the coop/pen space available) to have a better chance at getting at least one tom, especially if you plan on breeding your birds.
The breeds available will vary, so you might have a few choices in mind when you are ready to order.
Brooding Poults
It’s important to have your brooder set up and all of your supplies before you bring any poults home. The more prepared you are, the easier this experience will be for all involved.
Take this time to verify that all of your equipment works, and you have everything needed to keep the brooder warm and clean.
The brooder should be kept in a draft free, quiet area, that is well protected from predators. Poults are easily spooked and if disturbed or frightened could result in injury or death.
It’s recommended to handle your poults frequently to get them used to being picked up and touched.
Spending some extra time with them now will pay dividends later. This will make moving and examining your birds a lot easier.
You’ll also need to take each poult to the food and water and gently dip their beaks into them. Yes, they need to be shown specifically where the food and water are, and you need to encourage them to use both.
Most likely, you’ll need to do this a few times before they get the idea, but it’s very important to make sure each one is eating and drinking well.
Also, show them the brooding plate and place them underneath it, so they know where to find warmth.
Turkeys of any age tend to pack into corners when stressed or scared, which causes them to injure themselves or suffocate, so a round brooder is needed.
You can purchase a round brooder online or in a farm supply store, or you can use a plastic kiddie pool.
If using a kiddie pool, you will want to raise the height of the pool sides by placing a ring (about 2 -21/2 feet high) of cardboard. This extra height will keep the poults from being able to get out of the brooder as they grow.
I always recommend having two pools and cardboard rings. Having the extra will make cleaning the brooder a lot easier for you and the poults.
Large flake pine shavings or recycled newspaper bedding (like Carefresh) make the best bedding for poults.
Avoid anything that will make the surface slippery, as slick surfaces could cause foot and leg issues and don’t absorb liquids very well.
You need to place a 2-3 inch layer of bedding into the brooder. You’ll spot clean at least once a day by scooping out any droppings or wet bedding. And change it at least every 3 days (more often if necessary).
During a complete change, the brooder should be wiped down using a bleach solution (1 cup of unscented bleach to a gallon of water). Make sure the brooder is fully dry before setting it back up. It’s very important to always keep your brooder clean, this will help keep your poults healthy during the time they are most vulnerable.
The brooder should be kept at 95 degrees F for the first week, and it should be lowered by 5 degrees each week until the poults are completely feathered (6-8 weeks of age).
The best way to keep your brooder warm is by using a brooding plate, which are available at farm supply stores or online.
Brooding plates will keep the temperature consistent and pose less risk of fire than using a heat lamp.
When your poults are about 3 weeks old, you can give them a roosting bar.
Once the poults are completely feathered and if the outdoor temperature is 70 degrees F or above, you can start to let your poults spend some time outdoors.
Don’t overwhelm them, introduce them to the outside gradually over 10 days.
Keep an eye on them and monitor them closely for any signs of distress, or being cold.
If your poults are showing any signs of distress, put them back into the brooder and try again the next day.
Be sure to show them how to go into the coop, so they will get used to it and will go into it easily every night.
Just remember, this new outdoor world is scary for your poults. Be patient with them and give them the time they need to make the transition safely.
Important points to keep in mind for successful poult raising:
-
- Your poults should have food and water available at all times (never let the containers go empty).
- You will need to use a gravity feeder and waterer (needs to have a narrow water moat) made for chicks or poults.
- You do not want to use dishes in place of a gravity feeder and waterer.
- Water should always be at room temperature.
- The poults should be fed a turkey/game bird starter crumble until they are 6 weeks old, and then can be switched to a turkey/game bird grower feed.
- There should be a dish of poultry grit available to the poults at all times, this is important for proper digestion.
Keeping Your Turkeys Healthy
To keep your turkeys in the best health possible, it’s important to become familiar with their anatomy, diseases and health issues.
A general understanding will make it easier to identify any symptoms or issues you might see in your birds. This would allow you to provide faster treatment and potentially save their lives.
A list of health issues and diseases that commonly affect turkeys is provided below. I’ve also included a list of supplies to set up a first aid kit to have on hand should the need arise.
Examine each bird frequently, daily if possible. Look closely for any signs of illness or injury.
Pay attention to any discharge from the eyes, nares (nostrils), and mouth. Check for a dirty vent (rear end), abnormal droppings, lethargy or signs of injury.
A list of the signs and symptoms of illness is provided below, it’s always best to make daily heath checks a habit.
Check local listings for veterinarians in your area that are experienced in treating birds or livestock, keep a few of the numbers on hand in case of emergency or if you require advice on treatment.
Set up a quarantine cage or two in case you require it. Having this done in advance will save you considerable time when treating a bird, becomes necessary.
You can build a quarantine cage out of wood and hardware cloth, or you can use a metal dog cage or plastic carrier.
Just make sure the cage is large enough for the turkey to move around and hold a food and water dish.
Keep this cage in a warm, draft free, quiet area that is away from all other animals.
Most importantly, you need to keep it away from your brooder and your other birds.
If it’s in too close of a proximity to them, it puts the other birds at risk of becoming ill.
Use pine shavings, recycled newspaper bedding (like Carefresh), puppy training pads or newspaper (no shiny ads) in the cage. Since the bird is in a smaller enclosure, you need to change the bedding at least once a day.
This is very important to keep the droppings from building up, which will help keep bacteria from growing and keep your bird clean and dry.
You can use a food and water dish in the cage (use heavy ceramic crocks to prevent tipping). Wash them regularly.
If you’re treating poults make sure to place a layer of marbles in the water dish (use a shallow dish) to prevent drowning.
You should fully clean the cage by wiping it down every couple of days using a bleach solution (1 cup unscented bleach to 1 gallon of water).
Always make sure the cage is completely dry before placing new bedding and the bird back in it. This is why I like to keep two cages on hand.
Food and water should be available at all times.
And the water should be changed anytime it’s soiled with bedding.
In fact, keep the food dish on the opposite side from the water to prevent the food from becoming wet. Wet food must be removed right away.
You should have a pair or two of coveralls or a few sets of old clothes, and also a pair of old shoes to wear anytime you are around the sick bird. Wash these daily to prevent cross-contamination.
The potential to transfer the illness to your healthy turkeys will always be there, so take precautions.
Be sure to always wash your hands and arms before going near your healthy birds, you can’t take too many precautions when it comes to protecting the health of your birds.
Hopefully you will never need your quarantine cage and supplies, but it definitely is nice having them there if the need arises.
Harvesting Your Turkeys
It’s inevitable, your turkeys will need to be harvested and processed eventually.
Before harvesting day arrives, be sure to check your local laws, ordinances and rules regarding home processing. Not all areas allow this.
Some areas require a permit and others have banned it entirely. Also, if you intend to sell meat to the public, check the laws in your area regarding the selling of meat from your home.
You may be required to have your turkeys processed at a USDA certified facility.
Harvesting livestock can be the most difficult part of raising them, but it’s a necessary one.
The most important thing is that the process is done as quickly and humanely as possible. After all, this animal is giving its life to feed you and your family, and it deserves the most humane end that you can give it.
If you have never hunted or harvested an animal before, you should become familiar with the process before you attempt it. There are videos available online (watch several times to become familiar with how it’s done) or check around for any other poultry breeders in your area.
Ask if they would allow you to observe the process (even ask if they would be willing to come assist you the first time you do it at home).
Believing you can do it and actually doing it are completely different. This is not a time to be hesitant in any way, as you’ll add stress and pain to the animal.
If you aren’t completely sure that you can do it yourself, have it done by a professional poultry processor (some now offer mobile services).
Always be sure that you give the animal a quick and humane end.
When processing at home, always be sure to do it in an enclosed area such as a garage or basement and out of view of neighbors and children.
List of Popular Heritage Turkey Breeds & Adult Weights
Breed
Adult Male (Tom) Size
Adult Female (Hen) Size
Royal Palm
18 – 20 lbs
10 – 14 lbs
Midget White
16 – 20 lbs
8 – 12 lbs
Blue Slate
Up to 23 lbs
Up to 14 lbs
Bourbon Red
Up to 30 lbs
12 to 14 lbs
Black Spanish
Up to 28 lbs
Up to 14 lbs
Narragansett
More To Discover
- Why You Should Start Feeding Fermented Grains to Your Poultry: A Journey from Ancient Practices to Modern Farms
- US Considers Poultry Vaccination in Response to Devastating Avian Flu Outbreak
- Keep Chickens in Your Backyard and Feed Healthier Eggs to Your Family While Saving Money
- UK’s Chicken Industry in Crisis: 80 Million Deaths Point to Unsustainable Practices
Up to 30 lbs
Up to 17 lbs
Signs of Illness in Turkeys
-
-
- Abnormal droppings
- Dirty Vent (rear end)
- Discharge from eyes, nares (nostrils), mouth
- Inactivity
- Sneezing or wheezing
- Loss of appetite
- Paralysis
- Head tucked under wing
- Abnormal posture
- Ruffled feathers
- Missing featherss (other than during moulting)
- Shriveled or pale or purple wattle or nasal snood (strip of flesh over beak)
- Lameness
- Weight loss
- Swollen Joints
- Swelling on head or neck
- Frequently shutting eyes
- Unresponsive to touch or sound
-
List of Diseases in Turkeys
-
-
- Avian Influenza
- Aspergillosis (Fungal pneumonia)
- Botulism
- Coryza
- Newcastle Disease (Fowl pox)
- Pasturella (Fowl cholera)
- Erysipelis
- Coccidiosis
- Black head (Histomoniasis)
- Salmonella
- Sinusitis (Mycoplama gallisepticum)
- Mycoplasmosis
- Osteomyelitis
- Infectious brochitis
- Capillaria
- Hemmoragic enteritis
- Gape worm
- Intestinal Worms
- Mites/lice
- Scaley leg mites
- Crop impaction
- Sour crop
- Spraddle leg
- Prolasped vent
- Bumble foot
- Egg binding
- Egg peritonitis
- Fly strike
-
First Aid Kit for Turkeys
-
-
- Vetwrap
- Disposable medical gloves
- Eye dropper and oral syringe
- Vetericyn Poultry Care Spray
- Non-stick gauze pads
- Tweezers
- Bandage scissors
- Scissors
- Styptic powder
- Super glue gel (for broken beak repair)
- Chlorhexadine 2% solution
- Antibiotic ointment (no pain reliever)
- Hydrogen peroxide
- Hand sanitizer
- Avian vitamin supplement (available at pet stores or online)
- Small dog nail trimmers
- Epsom salt (to use to soak foot with bumble foot)
- Pedialyte
- Paper Towels
- Old towels (all sizes) and wash cloths
- Coveralls or old clothes
- Vet numbers (that are experienced in treating birds or livestock)
-