


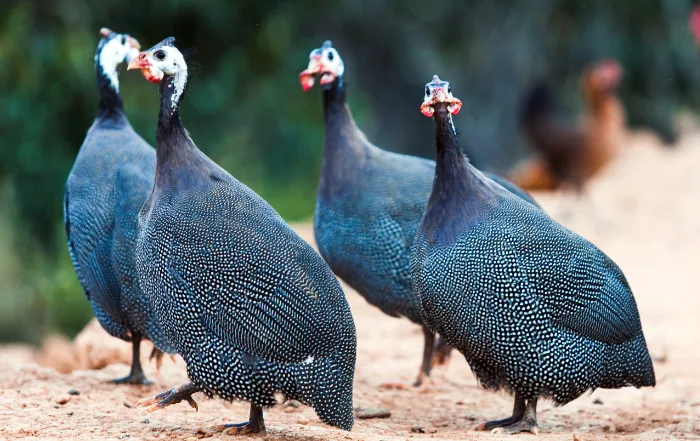

Guinea fowl are interesting, funny, entertaining, hardy birds that are easy to care for and raised for their lean, dark meat and eggs.
While guinea fowl can be raised in your backyard, there are some things to consider before bringing them home.
First, guineas aren’t recommended for small backyards where houses will be less than 100 yards from their enclosure. Simply put, they’re loud birds!
Yes, they’re great watch dogs, and they’ll certainly alert you to any intruders. But their calls are loud, and they’ll alert any time of the day or night, so keep this in mind if you are considering adding guineas to your yard.
The video below will give you a good idea of just what you’re in store for with guinea fowl on your property.
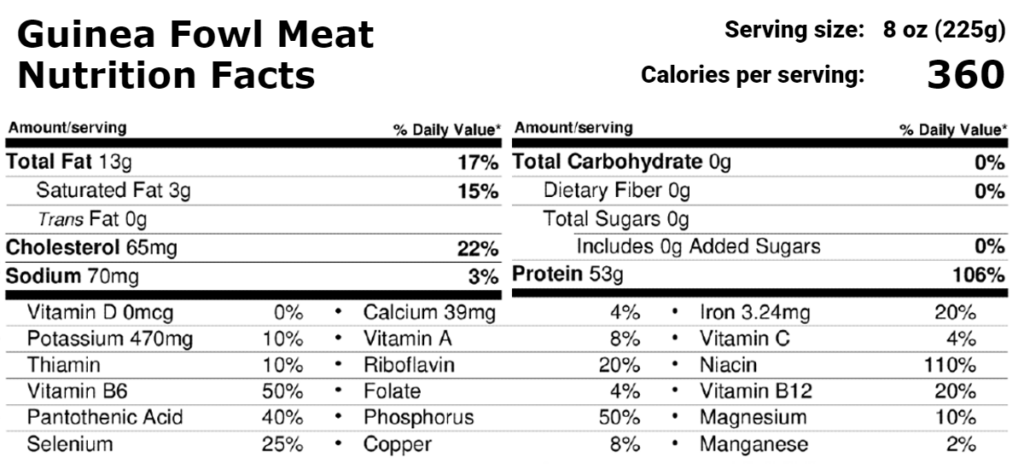
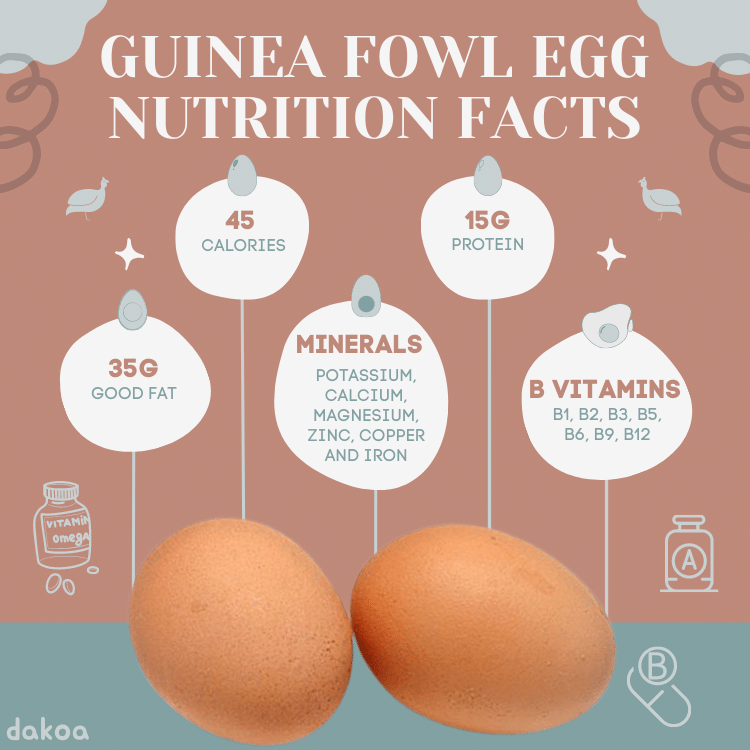
You can choose to raise your guineas for meat, eggs, or both.
Guinea fowl meat is similar in taste to pheasant, with very flavorful eggs. These birds are more resistant to diseases and are more tolerant of heat than chickens.
Please keep in mind, guinea fowl are not chickens. Guineas are strong-willed, independent birds and won’t behave as pets, as chickens can. Guineas prefer the company of other Guineas.
Now, if Guineas sound like the bird for you, use this guide to help you get set up and start raising them in your backyard.
How To Choose The Best Location For Your Guinea Fowl
The first thing you need to do is to check all the local ordinances and rules regarding raising livestock in your area. If you live in an HOA, be sure to check with them for any rules and regulations they have.
You don’t want to get everything set up and find out raising guineas in your area isn’t permitted.
Next, you’ll want to look at your yard and figure out where you want to place the coop and enclosure. Please remember that you’ll want the enclosure at least 100 yards away from any houses (including your own).
Once you have an area in mind, measure the length and width of the space you have available. You’re going to use these measurements to determine how many Guineas you can keep comfortably. Each bird will need two to three square feet of coop space and at least 10 square feet of space in the exercise pen.
Guineas prefer to be kept in groups with a minimum of three, but six is usually better. Always try to provide your birds as much space as you can.
Reduce your stress by having the coop, pen, brooder and all of your supplies ready before bringing any Guineas home. Having everything built and working will make things a lot easier on you and the new keets.
Guinea Fowl Housing Options
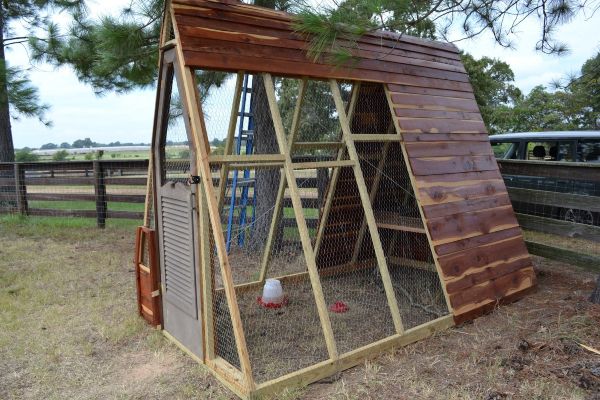
The Coop
Now that you have your location and know how many Guineas you can keep in your space, you can set up a coop to keep your Guineas in at night, close them in, or they will be out alerting you and your neighbors anytime a critter wanders in their view. Guineas don’t usually go into a coop on their own, so you will need to do a little training to get them into the coop to start the keets (young Guineas) the same day you put them in the pen.
Another tip is to place a battery powered light in the coop, Guineas don’t like to go into a dark area and the light may make them more comfortable.
You can purchase a garden shed, or you can build a coop yourself (there are several designs available online), if possible always make the coop larger (space permitting), so you have space available if you end up having more birds than you originally planned (especially helpful if you are breeding your own, Guineas are prolific breeders), overcrowding your birds will increase stress and fighting and also increase the risk of disease.
Remember to allow 2-3 sq.ft. of space per bird in the coop.
Guinea fowl naturally roost in trees and prefer their roosts to be high up in the coop, at least 6 feet high and the roosting bars should be a round wood dowel that has a circumference of 2-2.5 inches, this will give them a roost similar to a tree branch. Be sure to mount the roosting bars using a secure fitting U shaped bracket, so you can remove the bars easily for cleaning.
Mounting a dropping board under the roosting bar will make cleaning the coop a lot easier, mount the board using brackets, so you can lift the board out daily for cleaning. Line the board with linoleum tile to help protect the wood and also make cleaning it easier.
The roosting bars and dropping board should be removed and cleaned daily, brush any droppings off the bars, and remove any bedding and droppings off the dropping board and then wipe clean using a bleach solution(1 cup unscented bleach to 1 gallon of water).
Make sure you allow the bars and board to dry completely before putting them back in the coop.
If your coop has a wood floor, it’s a good idea to put linoleum tiles down to help protect the wood from moisture and make cleaning it easier. You can use pine shavings or recycled newspaper bedding (like Carefresh) for your coop. Just add about a 3-inch layer to help absorb droppings and moisture.
The bedding should be spot cleaned daily by removing any clumps of droppings. You also need to remove the bedding completely at least once a week, and clean the floor with the bleach solution mentioned above.
You’re going to have a lot of bedding and droppings to dispose of regularly, which means a lot of trash bags going to the landfill.
So, please consider setting up a compost or worm bin to dispose of the dirty bedding. It’s better for everyone, and you get a wonderful nutrient packed compost to use in your gardens and houseplants.
If you do set up a worm bin, the compost will be even more nutrient rich, and you will be able to treat your Guineas to fresh worms as a protein packed treat. Composting is really a win-win for everyone.
You can provide nest boxes for your Guinea hens, but Guineas are not well known for using them. These birds prefer to lay their eggs out in the exercise pen.
That said, you can try putting a few boxes in for them to use, unlike chickens they prefer to use a box that is open (like a tray with 2 inch high sides) with a 2-inch layer of bedding. Place a dummy egg (some use ceramic eggs or even golf balls) or two in the box to encourage the hen to use it.
When it comes to collecting the eggs, be sure to always leave a couple eggs or dummy eggs in the nest (no matter where they are laid) so that the hen will continue to return to that nest. If all eggs are removed, the hen will likely change the location for her next nest, making it harder for you to track the egg-laying location.
Keeping your Guinea’s coop clean is very important for the health of your birds. A dirty coop is a breeding ground for bacteria, fungi and disease. Not to mention the odor that will attract pests. Diligence when it comes to cleanliness really benefits all involved.
The Exercise Pen
The exercise pen is where you will find your Guineas the majority of the time.
Guineas are active birds that enjoy spending their days searching for bugs in their enclosure and roosting on branches, the pen should allow at least 10 sq.ft. of space for each bird, but it’s always best to give your birds as much space as your chosen area can provide to allow them to be happy and healthy both mentally and physically.
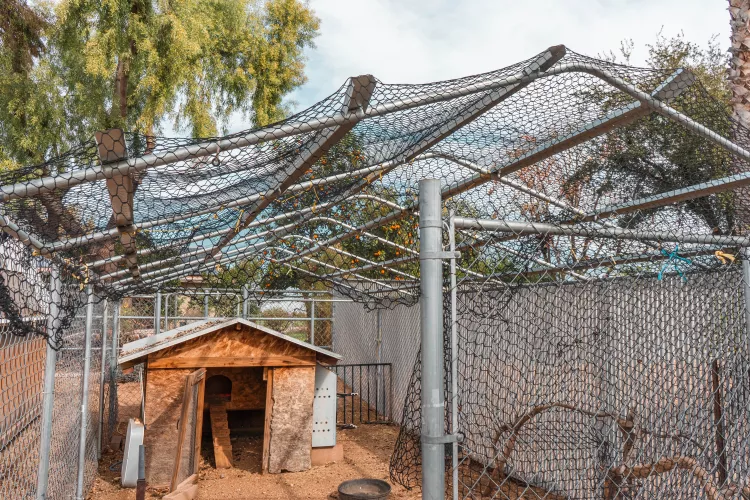
The pen must be covered, preferably with a roof, but if that isn’t possible, at least have it covered with hardware cloth, Guineas can fly, and if they escape, being roamers by nature, they won’t return home.
Roofs are the best option if you are able to do it in your area, the roof will keep the pen drier (Guineas prefer a dry environment), will allow the birds to spend more time outdoors and also provide shade and protection from predators, so if at all possible roof your pen, you and your birds will be happy you did.
When deciding on a substrate for your pen, look online at the options that are recommended and choose the one that will work best for your climate and environment.
Whichever substrate you decide to use, the pen should be spot cleaned by removing any dropping clumps or wet bedding at least once daily and if bedding is being used, should be changed completely once a week.
It’s very important to keep your birds’ environment as clean as possible to keep them healthy, reduce bacteria and fungal growth, reduce odors and help reduce the amount of flies and other pests attracted to your yard. Having a clean environment will make everyone happier and healthier.
Your Guineas will enjoy having some tree limbs and branches to roost on in their pen, be sure that the limbs and branches are secured so that they don’t tip over onto your birds, and if you don’t have access to tree branches, you can build some roosts using the same type of wood dowels that you used in the coop.
Planting some bushes and groups of ornamental grasses around the pen will give your Guineas places to hide and to explore for bugs and, if planted along the fence line, will also provide some wind block for your birds.
Be sure to check around any of the plantings daily for any eggs the hens may have laid, Guineas will seek out clumps of grasses and bushes to build their nests.
Your Guineas should have a dust bath or two available in the pen, dust bathing keeps the skin and feathers healthy, you can build a tray with 2-3 inch high sides, or you can buy a plastic under the bed storage container (find one with 2-3 inch high sides)and fill it with construction sand. Your birds will thank you.
Predator Proofing Your Coop and Pen
Yes, Guinea fowl are great watch dogs and will alert you when a predator is nearby, and they have been known to attack and kill snakes, but they can’t protect themselves against the majority of predators, so predator proofing your Guineas coop and pen is very important to prevent the loss of your birds.
Predators are everywhere, even in the city, there are wild predators (raccoons, foxes, coyotes, birds of prey, etc.) and domestic (cats, dogs and people) predators, and they will do whatever they can to get to your Guineas for a good meal, so take every precaution possible to keep your Guineas safe.
To protect the coop, attach hardware cloth (hardware cloth is stronger than chicken wire for predator proofing) over all windows, vents, and small openings using screws and washers, and if you have a dirt floor in the coop, be sure that you attach hardware cloth to the walls and cover it with at least 2 inches of dirt, the hardware cloth with keep predators from getting into or digging under the coop.
You will need to use predator proof latches on any coop doors, a clever predator (especially raccoons) can figure out how to open many latches, you can find these at farm supply stores or online.
The exercise pen should have 3–4 feet of hardware cloth buried both on the inside and the outside of the entire perimeter of the pen’s fence line, doing this will help prevent predators from digging under the fence to get to your Guineas.
Your pen should have a roof (the best option) or be covered with hardware cloth, this will keep aerial predators and any climbing predators from getting in. Depending on what latches are on your gates, use predator proof latches or place a carabiner through any liftable latches.
Predators are very smart and determined when it comes to getting a meal, so always do everything possible to keep your Guineas safe.
Feeding & Nutrition 101
Your Guinea fowl should have food and water available at all times and the feed should be nutritionally complete and the best quality you can provide, proper nutrition is very important to keep your Guineas healthy and able to provide you with the best meat and eggs.
Guinea fowl chicks, or keets, need a higher protein level than chicken chicks, and will need a higher protein feed until they are 12 weeks old, here is the recommended feed for each stage of growth for your Guineas.
Be sure to get your feed in the crumble variety and not pelleted, Guineas can have issues with some of the additives used to create the pellets.
-
- Hatch- 5 weeks- 24-26% Protein Turkey or Game bird starter crumble
- 5 -12 weeks- 20-22% Chick starter crumble
- 12 weeks and up- 16% Poultry layer ration crumble
Guinea Fowl Care Made Easy: Feeding and Hydration Tips
1. Choosing the Right Equipment: Opt for gravity feeders and waterers for your guinea fowl. Young keets in the brooder need specialized gravity waterers with narrow moats to prevent drowning. A chick feeder with multiple openings is ideal until they’re big enough for gravity feeders.
2. Daily Care: Keep waterers clean and filled as needed. Weekly, clean them with a bleach solution (use the provided ratio) and rinse thoroughly before refilling. Empty and clean feeders with bleach at least weekly, ensuring they dry completely before refilling.
3. Efficiency with Two Sets: Having two sets of feeders and waterers simplifies cleaning. Rotate clean ones in while cleaning the dirty ones for the next round. Promptly remove wet feed to prevent mold and illness.
4. Protect from the Elements: Shelter feeders and waterers under a mini carport to keep them dry and shielded from excessive sunlight. Elevate them on paving stones to prevent dirt or bedding from getting in. Provide poultry grit and crushed oyster shell at all times.
5. Fresh Foods for Joy: Offer fresh foods daily, but limit them to 10% of the diet. Dark leafy greens, alfalfa, zucchini, summer squash, apples (seedless), berries, sunflower seeds, millet, barley, oats, freeze-dried crickets, mealworms, and earthworms are enjoyed. Remove uneaten produce within 2 hours to prevent spoilage.
With these simple steps, you’ll ensure your guinea fowl are well-fed, hydrated, and thriving in their environment.
Where To Find Your Guinea Fowl
Hatcheries like McMurray’s Hatchery, Meyer Hatchery, and Stromberg’s offer guinea fowl through both mail-order catalogs and online platforms. The availability of colors and timing of guinea availability may vary between hatcheries.
Keep in mind that guineas cannot be reliably sexed until they’re around 12 weeks old.
Most hatcheries typically offer day-old chicks, so if you plan to breed them, consider purchasing a few extra to increase your chances of having both males and females.
However, ensure that you don’t exceed the space you have available.
Breeding Considerations
Guinea fowl form pairs for breeding, so if you’re building a breeding flock, aim for a 50-50 ratio of males and females.
These birds are social creatures and thrive in groups, so for your initial order, it’s recommended to get at least 6 keets (young guinea fowl).
A Kaleidoscope of Colors
Guinea fowl come in a stunning array of colors, including Chocolate, Pearl (the most popular), Royal Purple, Violet, Blue, White, and Pied.
Explore these different varieties and select the one or combination that appeals to you.
Keep in mind that availability may vary when you place your order, so it’s a good idea to have a few options in mind. The feathers of guinea fowl, especially the Pearl variety, are sought after for crafting and fly-tying purposes.
If you plan to harvest your guineas, consider letting crafters and fly fishermen know about the availability of these feathers.
By choosing and caring for your guinea fowl, you’re not only adding unique beauty to your flock, but also potentially contributing to various crafts and hobbies.
Brooding The Guinea Fowl Keets
Ensure your brooder is operational for at least 24 hours before your new keets arrive. This gives you the chance to check all equipment and ensure the brooding plate is working correctly. Keets are highly sensitive to cold temperatures, so a warm and functioning brooder is essential upon their arrival.
As soon as your keets arrive, place each one under the brooding plate to ensure they understand the heat source. This step is crucial to keeping them warm and comfortable.
You’ll also need to guide each keet to their food and water, placing their beak into the dishes. This teaching process might need repetition until they catch on. Remember, this is a nurturing step that imitates what a mother would do, ensuring their well-being under your care.
You have options for obtaining a brooder. You can purchase one from a store or online, or you can create your own. Plastic children’s wading pools are cost-effective and easy to maintain.
Make sure to place a high cardboard barrier around the pool to prevent keets from jumping out. Swap it out if it gets soiled or wet.
Place 2–3 inches of pine shavings or recycled newspaper bedding (avoid cedar shavings) in the brooder. This creates a comfortable environment for the keets.
Brooding plates are an ideal way to maintain a consistent temperature for your keets. They provide heat while minimizing fire risks. You can find these plates at farm supply stores or online.
Maintain the brooder temperature at 95 degrees F for the first week and decrease it by 5 degrees each subsequent week until the keets are fully feathered, usually around 6–8 weeks old.
Regularly spot clean the brooder by removing droppings and adding fresh bedding.
Perform a thorough cleaning once a week by sanitizing the brooder with a bleach solution.
Make sure the brooder is completely dry before setting it up again. If you have two brooders, you can easily rotate them for cleaning, saving time and reducing stress on the keets.
You will need to use a gravity waterer that is made for chicks, these have a narrow moat and help prevent drowning.
The waterer should be filled frequently, and the water should be at room temperature never cold water, don’t let your keets go without water at any time.
The waterer should be cleaned at least once a day (more often if it becomes soiled or filled with bedding) using soap and water (rinse well) and sanitized at least once a week using a bleach solution (1 cup unscented bleach to 1 cup of water) and rinse well before refilling.
Hatchling keets should be fed using a multi opening chick feeder for at least the first couple of weeks, but can be switched to a gravity feeder.
You should refill the feeder as often as needed, the keets should have food available at all times, it should be cleaned at least every couple of days using soap and water, rinse well and dry completely before refilling, and it should be sanitized at least once a week using a bleach solution, rinsed well and dried completely.
Always remove any wet or soiled food right away to prevent spoilage, which will harm your keets. After a couple of weeks, place the feeder and waterer on a patio paver to help keep the keets from scratching bedding into them.

The keets should always have a dish of poultry grit available to them, the grit is important for proper digestion.
Guineas are not known for being cuddly birds and will not enjoy being picked up and carried, but it’s important to take some time to handle each keet daily to get them used to some handling. You’ll be glad you did when it comes time to move your keets for any reason.
The keets will be ready for the coop when they are fully feathered, usually 6–8 weeks, be sure to put them in the coop with the door closed when you put them outside, to get them used to the coop for an hour or so and then open the coop door and let them explore their outside run, always corral them back into the coop at night and close them in until morning.
Keeping a battery operated light in the coop will help your keets feel more comfortable, also place the feeder and waterer in with them to be sure they have food and water available to them.
Monitor your keets closely during the first couple of days they are outside to be sure that they are eating and drinking and not becoming stressed, if they are showing any signs of distress, consider putting them back into the brooder and try slowly increasing their time outside until they are comfortable.
This isn’t usually a problem for Guineas, they are more independent than chickens and adapt to outdoor life fairly quickly.
How To Keep Your Guinea Fowl Healthy
Guinea fowl are pretty hardy birds and are more resistant to disease than other poultry. That said, it’s still important to know the signs of illness and the diseases you could encounter when you raise Guineas.
I’ve included a list of things you should watch for that likely point to illness, as well as a list of supplies to create a first aid kit for your Guineas.
Animals are masters at hiding injuries and illness as a way to avoid predators. This does make it difficult at times. So please understand that by the time you begin to notice signs, your bird is already very sick. Time is of the essence if you want to save your bird and protect the rest of the flock.
It’s a good idea to look up veterinarians in your area that have experience in treating birds and livestock, and keep a couple of their numbers on hand to contact in an emergency.
Also, designate an area and a quarantine cage in case of emergency. This way, if you do get a sick or injured Guinea, you have what you need on hand, and you won’t have to run around in a panic to find things.
The area you chose to quarantine the ill bird must be far away from the flocks coop and pen, as well as the brooding area. This sick zone must be draft free, warm, quiet and safe from pets, unsupervised children and predators.
You can build a couple of quarantine cages, or you can use wire dog cages, be sure the cage is large enough to allow the bird to move around easily and hold food and water containers.
You can use the same bedding you use in the coop, puppy training pads or newspaper to line the cage and absorb moisture. It’s best to change the bedding at least once a day, and the cage should be wiped down using a bleach solution (1 cup unscented bleach to 1 gallon of water). Make certain the cage is dry before setting it back up.
It’s helpful to have two cages handy. This way, you can effortlessly transfer the sick bird to a clean cage. A dirty environment will encourage bacteria growth and either increase the recovery time or worsen the issue.
To reduce the risk of bringing germs back to the rest of the flock, have a pair of coveralls, a set of old clothes and shoes to wear while you are treating the sick bird. You’ll need to wash them at least every other day, so if possible keep at least two sets, so you always have a fresh set.
Always wash your hands and arms after handling the sick bird. It’s very important to take all the precautions you can to keep the rest of your birds from getting sick.
Once your Guinea is well and ready to return to the flock, clean the cage/cages, food/water containers, equipment and the area around the cage using the bleach solution and allow to air dry before storing. Wash all clothing, shoes and towels that were used during treatment and store with your first aid supplies.
Hopefully you will never need to use your quarantine and treatment supplies, but having them on hand is such a relief if the need arises.
Time To Harvest The Guinea Fowl
Harvesting an animal is the most difficult time for most farmers, but it’s a necessary one. And it’s very important that it’s done quickly and humanely. After all, these animals are giving their lives to feed you and your family. They deserve to be treated with respect and care when their time comes.
This is the circle of life, but it need not be unnecessarily cruel.
Check your local laws, rules and regulations regarding home harvesting of livestock. Some areas don’t allow it to be done at home and will require you to take your animals to a USDA licensed processor. It’s essential you know the rules in advanced. And be sure to check around your area for licensed processors.
Nowadays, there are a lot of processors that also have mobile services available. This reduces the stress on the animal as well.
If you are able to harvest at home, you will need to learn how to process your birds. Luckily, there are many videos on YouTube that will show you the proper procedures to use.
Thinking you can process yourself and actually doing it are completely different. Be sure you’re comfortable doing it because this process needs to be done quickly and efficiently for the sake of the bird. Hesitation will only cause these animals additional stress.
Any doubts whatsoever, take your birds to a professional processor or check around to see if there are any poultry farmers nearby that would be willing to come assist you.
The goal on harvest day should always be no suffering.
Remember, when harvesting at home, be sure that it’s always done in an area out of view of your neighbors and the public.
14 Common Signs of Illness in Guinea Fowl
- Abnormal droppings
- Changes in eating and drinking habits
- Discharge from eyes, nares (nostrils) or mouth
- Dirty vent (rear end)
- Dull eyes
- Fluffed feathers
- Head turned under
- Inability to stand
- Paleness in face, feet or legs
- Red or swollen legs or feet
- Sneezing, wheezing or labored breathing
- Staying apart from the flock
- Swelling in face, helmet or wattles
- Weight loss
15 Diseases and Health Issues in Guinea Fowl
- Avian Influenza
- Bumble Foot
- Coccidiosis
- E-Coli
- Egg Binding
- Fowl Cholera
- Fowl pox
- Impacted Crop
- Infectious Coryza
- Intestinal Worms
- Marek's Disease
- Mites and Lice
- Mycoplasma Galliseptum
- New Castle Disease
- Salmonella
Must Have Guinea Fowl First Aid Kit Supplies
- Antibiotic ointment (don't use pain reliever)
- Bird vitamins
- Blu-Kote
- Coveralls or old clothes
- Eye dropper
- Nonstick gauze pads
- Oral syringe
- Old shoes
- Old towels and washcloths (all sizes)
- Paper towels
- Pedialyte
- Rubbing alcohol
- Scissors
- Small dog nail clippers
- Styptic powder
- Super glue (great for small cuts and broken beak repair)
- Tweezers
- Unscented bleach
- Vetericyn
- Vet wrap
FAQ
What are some of the cons of raising Guinea Fowl?
-
- Guinea fowl are loud and will alert you to anything unusual or unfamiliar that enters your yard.
- They aren’t affectionate with people and don’t like being handled.
- They aren’t the best parents.
- They will tear up your garden by dust bathing.
- They are bullies and will bully any other birds they come across.
Will Guinea Fowl stay in your yard?
No, they will roam and also fly off in search of a new adventure and don’t always return home.
Can you raise Guinea Fowl in cool climates?
Yes, despite originally being from Africa which is hot and dry, Guineas are extremely cold hardy birds and will do just fine in cooler regions.